Desserts
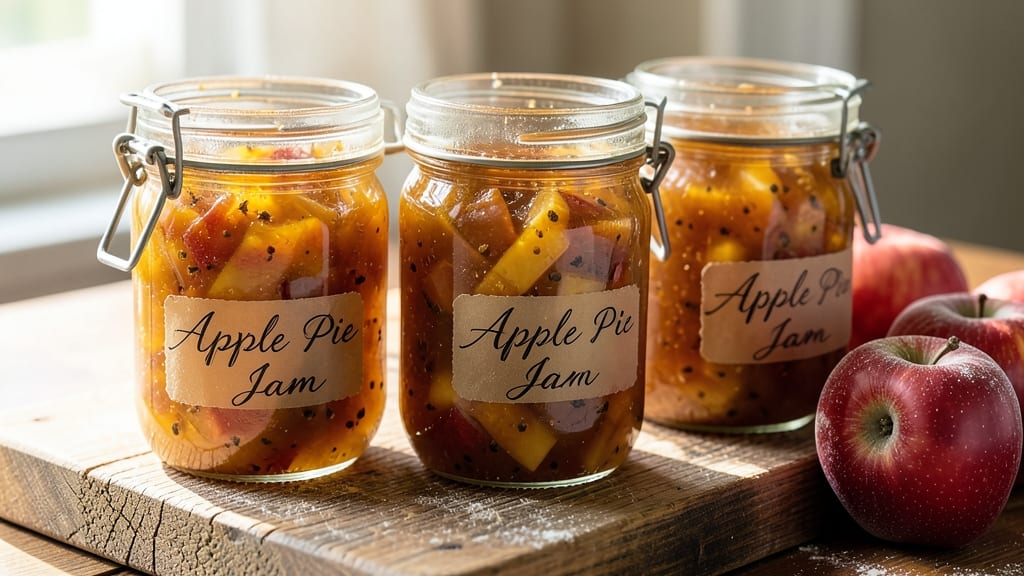
This apple pie jam canning recipe transforms seasonal apples into a rich, spiced spread that captures summer’s essence in every jar. The perfect balance of cinnamon, cloves, and lemon creates that nostalgic apple pie flavor—without requiring a pie dish.
I’ve perfected this method over years of canning, ensuring the jam stays vibrant and flavorful for up to a year on your shelf.
The process is straightforward but requires precision: peeling and cooking apples until tender, then combining them with sugar, pectin, and warm spices for that iconic pie-like taste. Sterilizing jars and lids is critical to prevent spoilage, and the water bath method guarantees shelf stability.
This isn’t just jam—it’s a taste of autumn you can enjoy anytime.
Once sealed, your jars will hold a thick, glossy jam with chunks of apple and a subtle spice warmth. Use it on toast, swirled into yogurt, or as a topping for pancakes and cheesecakes.
The versatility makes it a pantry staple, while the homemade quality elevates any dessert. Let’s preserve that apple pie magic for months to come.
With just a few ingredients and basic canning techniques, you’ll create a spread that tastes like a slice of pie in every spoonful. The key is patience—letting the flavors meld during the cooking process and ensuring proper sealing for long-term storage. This recipe delivers restaurant-quality results with a homemade touch.
Ingredients for apple pie jam canning
Six pounds of apples and a handful of spices transform into jam that tastes like summer.
| Ingredient | Amount | Notes |
|---|---|---|
| Red Delicious Apples 🍎 | 4 lb | Peeled, cored, cut into chunks |
| Granulated Sugar 🍚 | 6 cups | White or light brown preferred |
| Pectin (Ball RealFruit) 🍯 | 1 package | Low or medium sugar recommended |
| Lemon Juice 🍋 | ¼ cup | Freshly squeezed |
| Ground Cinnamon 🌿 | 2 tbsp | Freshly ground preferred |
| Ground Cloves 🌶️ | ½ tsp | Freshly ground for best flavor |
| Ground Nutmeg 🌶️ | ½ tsp | Freshly grated preferred |
| Salt 🧂 | ½ tsp | Fine sea salt |
| Water 💧 | 1 ½ cups | For pectin activation |
| Pint-Sized Mason Jars 🥫 | 6 whole | With lids and bands |
The apples are everything here—Red Delicious or Granny Smith work best because they hold their shape during cooking. Local farmers markets often have better quality than grocery stores, especially in apple season. Look for firm, unblemished fruit. If you can't find fresh cloves, whole cloves in a spice jar work too—just grind them fresh in a coffee grinder. The sugar is non-negotiable: light brown adds subtle molasses notes that complement the spices beautifully. I always buy the Domino brand for consistent results.
No pectin? Extra lemon juice plus 10 minutes longer cooking time can help thicken it, but results vary. Short on cloves? Allspice at double the amount gives a similar warmth. The Mason jars need to be sterilized properly—boiling them for 10 minutes in water works perfectly. For the water measurement, room temperature is key—cold water can shock the pectin and prevent proper gelling. If you're making a big batch, double the recipe but use quart jars instead of pints for better yield.
Once sealed, these jars keep for up to 12 months in a cool, dark pantry. The jam thickens as it sits—stir before each use to redistribute the apple pieces. I like to label mine with the date and recipe name so I remember what's inside. Freezing isn't recommended for long-term storage, but if you must, use within 6 months. The first jar you open will be your favorite—it's that good.
Why You'll Love This Recipe
- Fridge-Friendly Magic: I swear by this jam for lazy mornings—just grab a spoon and slather it on toast, no pie required. The pectin keeps it thick and spreadable for weeks, so you’re never scrambling for a last-minute breakfast fix.
- Cinnamon-Kissed Perfection: That first spoonful? Pure autumn in a jar. The Red Delicious apples hold their shape, and the cinnamon cuts through the sweetness just enough to make it feel like dessert without the fuss. Honestly, my kids beg for it on peanut butter sandwiches.
- Year-Round Comfort: Make a double batch in September, and you’ll thank yourself in January. It’s the star of charcuterie boards, a quick glaze for roasted pork, or even a fancy drizzle over vanilla ice cream. (Yes, even on a Tuesday night.)
- Budget Stretch: Apples and sugar are cheap, and one batch stretches into dozens of uses—no wasted ingredients here. Plus, canning it means you’re not buying overpriced store jams with mystery fillers. My secret weapon for stretching grocery money without sacrificing flavor.
Step-by-step instructions for apple pie jam canning
Here's how to make that perfect apple pie jam that tastes like summer all year long.
Prepare the Apples and Spice Mixture
Peel, core, and chop the 4 lb Red Delicious Apples into ½-inch chunks—you want even-sized pieces for consistent cooking. Transfer them to a large pot and toss with 2 tbsp ground cinnamon, 0.5 tsp ground cloves, 0.5 tsp ground nutmeg, and 0.5 tsp salt. This spice blend is what gives your jam that classic apple pie flavor. Let it sit for 5 minutes while you get everything else ready.
I like to use freshly ground spices here—they make a noticeable difference in flavor. If you're using pre-ground spices, give them a quick stir to break up any clumps before adding. The apples will start to soften slightly as they sit, which helps with the cooking process later.
Cook the Apple Mixture
Add 1.5 cups water to the pot with the spiced apples and bring it to a boil over medium-high heat. Once boiling, reduce the heat to medium and let it simmer uncovered for 15-20 minutes, stirring occasionally. You're looking for the apples to break down into a thick, chunky consistency—almost like applesauce. The mixture should reduce by about half and the apples should be tender enough to mash easily with a fork.
Here's the thing—don't rush this step. If the mixture isn't thick enough, your jam won't set properly later. You'll know it's ready when you can see the bottom of the pot through the thickened apple mixture and it coats the back of a spoon. If it's not quite there, keep simmering for another 5 minutes and test again.
Add Sugar and Pectin
While the apple mixture is still hot, stir in the 6 cups granulated sugar and 1 package Ball RealFruit pectin. Mix well to dissolve the sugar completely—this is crucial for proper gelling. The mixture will look watery for a moment, but don't worry, it'll thicken up as it cooks.
Here's where timing matters: add the 0.25 cup lemon juice next. The acidity from the lemon juice helps activate the pectin and ensures your jam sets properly. Bring the mixture back to a full rolling boil over high heat, stirring constantly with a wooden spoon. This is the critical point—you need to reach a full boil and maintain it for 1 minute to fully activate the pectin.
Prepare the Mason Jars
While your jam is boiling, prepare the 6 whole pint-sized Mason jars by running them through hot water and drying them thoroughly. This sterilization step is essential for safe canning. Place clean lids in a small pot of simmering water to keep them hot and pliable. Remove the jars from the water and let them stand upside down on a clean towel to drain completely.
Don't skip this step—proper sterilization prevents contamination and ensures your jam stays fresh. I like to work quickly here so the jars stay hot. Keep the lids in the warm water until you're ready to fill the jars, then use tongs to transfer them to your work surface.
Fill and Process the Jars
Using a funnel, carefully ladle the hot jam into the prepared pint-sized Mason jars, filling them to within ¼ inch of the top. Tap the jars gently on the counter to remove any air bubbles, then wipe the rims with a clean, damp cloth to ensure a good seal. Place the lids on the jars and screw on the bands until they're fingertip-tight—just snug enough to hold the lids in place.
Process the jars in a water bath canner for 10 minutes after the water returns to a full boil. This sterilizes the sealed jars and creates a vacuum seal. After processing, remove the jars and let them cool completely on a towel or rack. You'll hear the satisfying "ping" as the jars seal—this confirms a proper vacuum seal. Once cooled, store your jam in a cool, dark place for up to 1 year.
Pro Tips For Making Apple Pie Jam Canning
- Peel Apples First: Slice the apples into quarters or eighths before peeling them—it’s faster and way less messy. I used to peel first, then slice, and ended up with a counter full of apple scraps and a sore wrist.
- Simmer to 220°F: Use a candy thermometer to hit 220°F—that’s the magic number for setting pectin properly. I learned this the hard way when my jam turned into apple mush because I eyeballed it.
- Use Tart Lemon Juice: Skip the bottled "lemonade" concentrate—fresh lemon juice has the right balance of acidity and flavor. The cheap stuff can make your jam taste flat, and you’ll need more sugar to compensate.
- Sterilize Jars Hot: Run jars and lids through a boiling-water bath for 10 minutes before filling—no shortcuts. I once skipped this and had to toss a batch when the lids wouldn’t seal, even though the jam itself was perfect.
Serving suggestions for leftovers
Classic Toast Topping
Spread your apple pie jam on warm, toasted sourdough or brioche for an instant breakfast or snack that tastes like dessert. I like to drizzle with honey or sprinkle with flaky sea salt to enhance the flavors.
For extra indulgence, add a dollop of whipped cream or a scoop of vanilla ice cream on top. This combo is perfect for brunch or a cozy afternoon treat. 🥖
Yogurt or Oatmeal Swirl
Stir 2-3 tablespoons of your jam into plain Greek yogurt or vanilla yogurt for a flavor boost that pairs beautifully with granola or chopped nuts. For oatmeal lovers, add 1-2 tablespoons of jam to cooked oats along with a pinch of cinnamon and a drizzle of maple syrup.
The warm spices in the jam complement the creamy texture perfectly. 🥣
Cheese Pairings
Your apple pie jam makes an excellent pairing with aged cheddar, brie, or goat cheese. Serve it on a charcuterie board with crackers, nuts, and dried fruit for a sophisticated appetizer.
The sweet-tart balance of the jam cuts through the richness of the cheese beautifully. I also love spreading it on grilled cheese sandwiches with sharp cheddar for a sweet and savory twist. 🧀
Dessert Enhancements
Use your jam to elevate classic desserts like cheesecake, pancakes, or French toast. Swirl it into the batter before baking or drizzle it over warm desserts.
For a showstopper, top vanilla ice cream or panna cotta with a spoonful of jam and a sprinkle of toasted pecans. The jam’s spiced notes add depth to any sweet dish. 🍰
Baking Applications
Incorporate your jam into muffins, quick breads, or glazes for cakes. Mix ½ cup of jam into blueberry muffin batter for a twist on a classic recipe.
For a glaze, simmer ½ cup jam with 1 tablespoon butter and 1 teaspoon lemon juice until thickened, then brush over cupcakes or cookies. The result is a moist, flavorful treat with that signature apple pie taste. 🍞
Savory-Sweet Balance
Surprise your guests by adding a spoonful of jam to pork tenderloin glaze or ham glaze. Simmer ½ cup jam with 2 tablespoons apple cider vinegar and 1 tablespoon Dijon mustard until thickened, then brush over roasted pork.
The sweet-spiced jam balances the savory meat beautifully. It’s a crowd-pleaser at holiday dinners! 🍖
Nutrition facts
Frequently asked questions
Can I use any apple variety for this jam?
Red Delicious or Granny Smith work best because they hold their shape during cooking. Tart apples like Granny Smith add brightness, while sweeter varieties like Honeycrisp or Fuji create a richer jam. Avoid overly soft apples like McIntosh—they turn mushy during the cooking process.
What if my jam doesn't thicken properly?
This usually happens when the pectin isn't fully activated. Make sure you reached a full rolling boil for 1 minute after adding sugar and pectin. If it's still too thin, try adding 1 extra teaspoon of pectin and simmering for another 5-10 minutes. For next time, use low-sugar pectin if your apples are very tart, or reduce the sugar slightly.
How do I know if my jars are properly sealed?
After cooling, press the center of each lid—if it doesn't pop back up, the seal is good. You'll also hear a satisfying "ping" sound as the jars cool. If a jar doesn't seal, refrigerate and use the jam within 2 weeks. Unsealed jars may have condensation inside, while properly sealed ones will have a concave lid with no give.
Can I adjust the spice levels in this recipe?
For a milder flavor, reduce cinnamon to 1 tbsp and omit cloves. If you love spice, double the cinnamon and add ½ tsp ginger or ¼ tsp cardamom. Just remember that spices like cloves can be potent—start with half the amount if you're new to them. The key is balancing sweetness and warmth.
How long does homemade jam last before it spoils?
Properly sealed jars stored in a cool, dark pantry last 12 months. Once opened, refrigerate and use within 3 months. Watch for mold, off smells, or liquid separation—these are signs of spoilage. The jam will thicken slightly as it ages, so stir well before using. Freezing isn't recommended for long-term storage, but you can freeze opened jars for 6 months.