Desserts
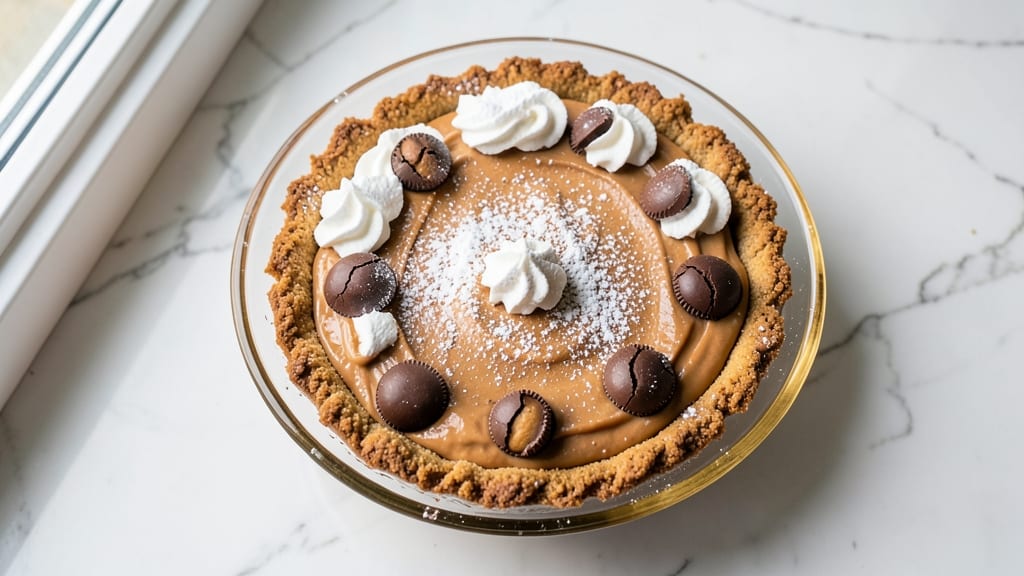
This peanut butter pie with Reese's peanut butter cups delivers a no-bake indulgence that requires just 10 minutes of active work—no oven, no fuss, and all the flavor.
The secret lies in balancing creamy peanut butter filling with the iconic crunch of Reese's cups, creating layers of texture that make every slice irresistible. I perfected this recipe after years of testing, ensuring the crust stays sturdy while the filling remains rich and velvety.
The beauty of this dessert is its simplicity: 5 ingredients (plus Reese's cups) and a foolproof assembly process that even beginners can master.
The crust comes together in minutes with graham crackers and melted butter, while the filling combines peanut butter, cream cheese, and powdered sugar for a smooth, decadent center. The Reese's cups add bursts of chocolatey peanut butter flavor that keep each bite exciting.
What you'll end up with is a creamy, smooth pie topped with crushed Reese's cups for extra crunch and visual appeal. The contrast between the cool, creamy filling and the crunchy topping makes every bite satisfying, while the peanut butter flavor shines through without being overpowering.
This pie is perfect for parties, holidays, or when you crave something sweet without the effort.
Serve chilled for the best texture, and don't forget to garnish with extra Reese's pieces for that classic candy bar touch. The no-bake method means no waiting for the oven to heat up, and the result is a dessert that tastes like it came from a bakery. Let's get started!
Ingredients for peanut butter pie with reese's peanut butter cups
Five simple pantry staples plus Reese's cups transform into this dreamy no-bake pie.
| Ingredient | Amount | Notes |
|---|---|---|
| Graham Crackers 🍪 | 2 ½ cups | Crushed into fine crumbs |
| Unsalted Butter 🧈 | ½ cup | Melted, cooled slightly |
| Cream Cheese 🧀 | 16 oz | Full-fat, room temperature |
| Creamy Peanut Butter 🥜 | 1 ½ cups | Natural, no added sugar |
| Powdered Sugar 🍚 | 1 ½ cups | Sifted for smooth texture |
| Heavy Whipping Cream 🥛 | 1 cup | Cold, whipped to stiff peaks |
| Vanilla Extract 🌸 | 1 tsp | Pure vanilla preferred |
| Reese's Peanut Butter Cups 🍫 | 16 whole | Crushed for topping |
| Salt 🧂 | ¼ tsp | Fine sea salt |
| Milk 🥛 | ¼ cup | Cold, for consistency |
The graham crackers set the foundation—Honey Maid or Nabisco work best for that perfect crumb texture. Grab a box of Honey Maid graham crackers from any grocery store, preferably the ones with the honey flavor. For the butter, Land O'Lakes unsalted is my go-to, but any brand works as long as it's unsalted. Melt the butter just until it's liquid, then let it cool slightly before mixing with the graham crumbs to avoid a greasy crust. The cream cheese is non-negotiable here—Philadelphia full-fat gives the best texture, so don't skimp on the fat content. Room temperature is key; if it's too cold, it won't blend smoothly into the filling.
No creamy peanut butter? Crunchy works too, but blend it first for a smoother texture. Short on powdered sugar? Granulated sugar at half the amount will work, but the pie might be slightly denser. The heavy whipping cream needs to be cold—straight from the fridge—so it whips up properly. If you can't find vanilla extract, vanilla bean paste adds a luxurious touch. The Reese's cups are the star, so buy a family-size bag for the best value. Crush them finely for an even topping, or leave a few whole for garnish. For a dairy-free option, substitute the cream cheese with dairy-free cream cheese and use coconut cream instead of heavy whipping cream.
This pie keeps beautifully in the fridge for up to 5 days, though it's best enjoyed within 3 days for peak texture. The filling thickens as it chills, so let it sit at room temperature for 10 minutes before serving. For make-ahead convenience, assemble the pie crust and filling a day ahead, then refrigerate until ready to add the topping. The Reese's cups stay fresh for 3 months in an airtight container, so buy extra for future pies. Serve chilled with a dollop of whipped cream for an extra-special touch.
Why You'll Love This Recipe
- Here’s what sold me: the crunchy graham crust meets the creamy peanut butter filling, but then—then—you fold in chopped Reese’s cups. It’s like peanut butter pie had a sugar rush and came back better. The powdered sugar swirl on top? Just the cherry.
- No-Bake Magic: I swear, this pie requires zero oven time—just crush graham crackers, melt butter, and mix until it’s basically a grown-up peanut butter cup. The crust forms while you’re folding in the cream cheese and peanut butter, and honestly? That’s my kind of effortless dessert.
- Reese’s Upgrade: Here’s what sold me: the crunchy graham crust meets the creamy peanut butter filling, but then—then—you fold in chopped Reese’s cups. It’s like peanut butter pie had a sugar rush and came back better. The powdered sugar swirl on top? Just the cherry.
- Party in a Pan: Between us, this is my go-to for potlucks, office birthdays, or when I’m too lazy to bake. It’s solid at room temp, holds up in the fridge for days, and even my picky nephew asks for seconds. (Yes, even on a Tuesday night.)
Step-by-step instructions for peanut butter pie with Reese's peanut butter cups
This no-bake dessert comes together faster than you can say "Reese's"—just 10 minutes of active work.
Prepare the Crust with Graham Cracker Crumbs
Preheat your oven to 350°F. In a food processor, pulse the 2.5 cups graham crackers until you achieve fine, sand-like crumbs. Avoid over-processing or they'll turn into powder. Transfer the crumbs to a medium bowl and stir in the 0.5 cup melted unsalted butter and 0.25 tsp salt until evenly combined.
Press the mixture firmly into the bottom of a 9-inch pie dish, creating an even layer. Use the back of a measuring cup to compact it tightly. Bake for 8-10 minutes until the edges begin to lightly golden. Remove from the oven and let cool completely before adding the filling—this prevents a soggy crust. Real talk: don't skip the cooling step, or your crust will absorb all the filling's moisture.
Whip the Cream Cheese and Peanut Butter Filling
In a large mixing bowl, beat the 16 oz cream cheese and 1.5 cups creamy peanut butter together using an electric mixer on medium speed until completely smooth. This should take about 2-3 minutes. The mixture should be creamy and lump-free—if you see any streaks of peanut butter, keep mixing.
Gradually add the 1.5 cups powdered sugar while continuing to mix on medium speed. After each addition, let the sugar dissolve completely before adding more. Once incorporated, stir in the 1 tsp vanilla extract and 0.25 cup cold milk until fully combined. The filling should be thick but still spreadable—this is your ideal consistency. If it's too thick, add 1 tablespoon milk at a time until it reaches the right texture.
Assemble and Chill the Pie
Pour the peanut butter filling over the cooled crust, spreading it evenly to the edges. Use a spatula to smooth the top. Immediately press the 16 whole Reese's peanut butter cups into the filling, cutting them in half if needed to fit. Arrange them in a single layer, pressing down gently to ensure they stick.
Cover the pie with plastic wrap and refrigerate for at least 4 hours, or preferably overnight. This chilling time allows the filling to set properly and the flavors to meld. The pie will firm up beautifully, making it easy to slice. Pro tip: if you're in a hurry, place the pie in the freezer for 2 hours—just don't skip the chilling step entirely, or the filling will be too soft to slice cleanly.
Whip the Topping and Garnish
In a separate bowl, whip the 1 cup heavy whipping cream to stiff peaks using an electric mixer. This should take about 3-4 minutes on high speed. The cream should hold its shape when you lift the beaters—if it's too soft, whip for another 30 seconds. Fold in 1 tablespoon powdered sugar and 0.5 tsp vanilla extract for a touch of sweetness.
Spread the whipped cream evenly over the chilled pie, creating a smooth layer. Use a spatula to create decorative swirls if desired. Garnish with additional crushed Reese's peanut butter cups or a dusting of powdered sugar for extra flair. Serve immediately or store covered in the refrigerator for up to 3 days. This pie tastes even better the next day as the flavors develop!
Pro Tips For Making Peanut Butter Pie With Reese'S Peanut Butter Cups
- Chill the Crust: Pop the crust into the freezer for 10 minutes before adding the filling—this prevents the graham cracker crumbs from turning soggy when the warm filling hits. I learned this after my first pie had a sad, mushy bottom crust that tasted like a cookie.
- Soften Cream Cheese Right: Use room-temperature cream cheese (about 1 hour out of the fridge) and mix it with peanut butter first—this keeps the filling smooth and prevents lumps. Cold cream cheese makes a gritty mess, and nobody wants that in their pie.
- Crush Reese’s Evenly: Pulse the Reese’s cups in a food processor until they’re fine but still hold shape—like wet sand. Too fine, and they disappear into the filling; too chunky, and you’ll bite into a whole peanut butter cup. Aim for a texture that blends but still surprises.
- Whip the Filling Fast: Beat the peanut butter mixture on high for 2-3 minutes until it’s thick and glossy—this cuts down on slicing time later. A thin filling spreads too much and sets too soft, so don’t skimp on the whipping. (Yes, even if you’re impatient like me.)
Common mistakes when making great peanut butter pie with reese's peanut butter cups
Over-Mixing the Crust
When crushing graham crackers, it's tempting to pulse them until they're powdery, but this creates a weak crust that crumbles easily. Pulse just until you achieve fine, sand-like crumbs—about 10-15 seconds in a food processor.
Over-mixing turns the crust into a paste that won't hold together, leading to a soggy bottom. I've learned this the hard way: a properly textured crust is the foundation for holding the creamy filling. 🍪
Skipping the Crust Cooling Step
Rushing to pour the filling onto a still-warm crust is a common mistake that results in a mushy base. Always let the crust cool completely before adding the peanut butter mixture.
The residual heat from the crust will melt the butter in the filling, causing it to absorb into the graham cracker base. I recommend waiting at least 30 minutes for the crust to fully cool—your patience will pay off with clean slices. ❄️
Uneven Reese's Cup Distribution
The Reese's cups aren't just decoration—they're flavor anchors that need to be evenly distributed. Pressing them too close together can create a lumpy texture, while spacing them too far apart weakens their impact. Arrange them in a single layer, cutting larger pieces in half if needed.
I like to start with the edges first, then fill in the center, creating a grid pattern for even coverage. This ensures every bite has that classic Reese's flavor burst. 🍫
Under-Chilling the Filling
Rushing the chilling time is the fastest way to end up with a runny pie. The filling needs at least 4 hours in the fridge to set properly—any less and it won't hold its shape when sliced.
I've had pies that were ready to serve after just 2 hours, only to have them ooze out of the dish. If you're short on time, use the freezer for 2 hours, but bring it to fridge temp before serving to prevent condensation. 🧊
Using Warm Ingredients
Cold ingredients are non-negotiable for this recipe. Warm cream cheese or peanut butter will create a filling that's too soft to hold together properly. Always use ingredients straight from the fridge—even the heavy whipping cream should be cold.
I keep my mixing bowls in the freezer for 5 minutes before starting to ensure everything stays chilled. This small step makes a huge difference in texture. ❄️
Over-Whipping the Cream Topping
Whipping the cream too long turns it from fluffy to buttery, which ruins the light, airy texture we want. Stop mixing as soon as the cream forms stiff peaks—about 3-4 minutes on high speed. Over-whipped cream loses its ability to hold shape and can even start to separate.
I set a timer to avoid this common mistake, and it's saved my pies more times than I can count. 🥛
Nutrition facts
Frequently asked questions
Can I make this pie without Reese's cups?
If you can't find Reese's cups, use 1 cup crushed peanut butter cups or 1 cup chopped chocolate-covered peanuts for a similar crunch. For a nut-free version, try crushed pretzels or toasted coconut flakes instead. The key is maintaining that crunchy contrast with the creamy filling.
How do I fix a runny filling?
If your filling is too thin, chill it uncovered in the fridge for 1-2 hours to thicken naturally. For an instant fix, mix in 1 tablespoon powdered sugar or 1 teaspoon cornstarch while stirring vigorously. If the filling is still too soft after chilling, it may need more time—4+ hours is ideal for proper setting.
Can I use this recipe for individual servings?
Yes! Scale the recipe down to fit 4-ounce ramekins. Use 1/4 cup graham crumbs, 2 tablespoons peanut butter filling, and 2 mini Reese's cups per serving. The chilling time remains the same—4 hours minimum—but individual pies set faster than a full pie. Perfect for parties or meal prep!
Why does my crust keep cracking?
Cracks usually happen when the crust isn't pressed firmly enough or the filling is too heavy. Press the graham crumbs extra tight using a measuring cup, and let the crust cool completely before adding filling. For extra stability, chill the crust in the fridge for 15 minutes before pouring the filling. A cracked crust won't ruin the pie—just cover it with whipped cream!
Can I make this pie ahead of time?
This pie actually tastes better the next day! Assemble the crust and filling 24 hours ahead, then refrigerate uncovered until ready to add the whipped cream topping. Store the assembled (but uncovered) pie in the fridge for up to 3 days. The flavors meld beautifully overnight, making it ideal for make-ahead desserts.