Desserts
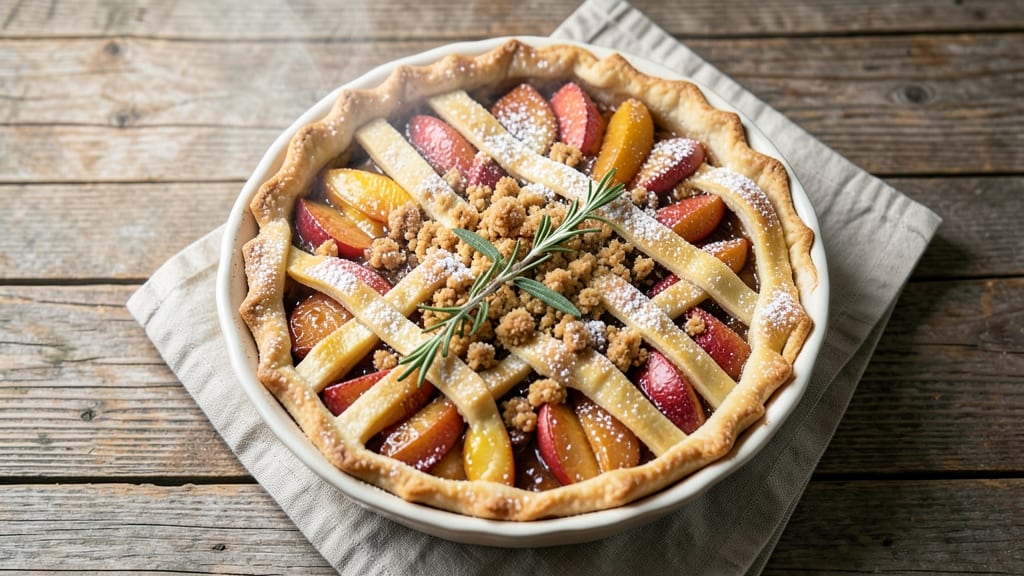
Grandma's pie recipe is the kind of dessert that turns ordinary days into celebrations—flaky crust, spiced filling, and that golden-brown perfection that makes every bite taste like home.
The secret lies in a foolproof crust made with cold butter and precise measurements, plus a filling that balances sweetness with just the right amount of spice.
I learned this recipe from my grandmother, who swore by her lattice crust technique to keep the fruit tender while letting the flavors shine through.
What makes this pie special is how simple yet transformative the techniques are. A blind-baked crust ensures no soggy bottoms, while a well-spiced filling—whether apple, cherry, or pecan—develops deep, caramelized flavors as it bakes.
The lattice crust isn't just decorative; it creates steam vents that keep the filling juicy without losing structure. My grandmother always said, "A pie's magic isn't in the recipe, but in the love you put into it."
By the time it emerges from the oven, you'll have a pie with a crisp, golden crust and a filling so tender it melts in your mouth. The aroma alone will draw everyone to the table, and the first bite delivers that perfect balance of sweet, spiced, and buttery.
This isn't just dessert—it's a piece of tradition, a taste of nostalgia, and a skill passed down through generations.
Serve it warm with a scoop of vanilla ice cream or let it cool slightly for that perfect slice. Whether it's for Thanksgiving, a family gathering, or just because, this pie brings comfort and joy in every bite. Let's get baking!
Ingredients for grandma pie
Nine simple ingredients transform into Grandma's legendary pie—crisp crust and spiced filling that taste like home.
| Ingredient | Amount | Notes |
|---|---|---|
| All-Purpose Flour 🌾 | 3 cups | Sifted for flaky crust |
| Unsalted Butter 🧈 | 1 cup | Cold, cubed for crust |
| Granulated Sugar 🍚 | ¾ cup | White or light brown |
| Light Brown Sugar 🍚 | ½ cup | Packed, for filling |
| Ground Cinnamon 🌿 | 2 tbsp | Freshly ground preferred |
| Apples 🍎 | 6 medium | Peeled, sliced thin |
| Lemon Juice 🍋 | 2 tbsp | Freshly squeezed |
| Salt 🧂 | 1 tsp | Fine sea salt |
| Ground Nutmeg 🌿 | ½ tsp | Freshly grated |
| Vanilla Extract 🍯 | 1 tsp | Pure vanilla |
| Large Eggs 🥚 | 1 whole | Cold, for crust |
| Ice Water 💧 | ¼ cup | For dough |
| All-Purpose Flour 🌾 | ½ cup | Extra for dusting |
The butter and flour are non-negotiable for that perfect flaky crust. Store-brand butter works fine, but if you can grab Plugrá or Land O'Lakes, use it—just make sure it's cold enough to hold its shape. I always buy King Arthur flour for the crust because it bakes up lighter, but any all-purpose will do. The apples? Granny Smith or Honeycrisp hold their shape best when baked. If you can't find those, Fuji or Gala work too—just slice them thinner so they soften faster. My grandmother swore by local orchard apples in season, but grocery store apples are fine if they're firm and sweet.
No vanilla extract? Vanilla bean paste works in a pinch, or a splash of vanilla sugar if you've got it. Running low on cinnamon? Pumpkin pie spice at the same amount adds warmth. The nutmeg is key here—it's what gives that classic pie aroma. If you don't have fresh nutmeg, ground works but toast it first (30 seconds in a dry pan) to wake up the flavor. For the crust, don't skip the ice water—it keeps the butter from melting too fast. And if you're worried about the crust getting soggy, blind-bake it for 15 minutes before adding the filling. Trust me on that one.
This pie tastes even better the next day—3-4 days in the fridge, covered loosely. For freezing, slice it first, then wrap each piece in plastic. Keeps for up to 3 months. I always make two pies when company's coming—one for today, one for leftovers. The crust reheats beautifully in a 350°F oven for 10 minutes if it's been sitting out. And if anyone asks, the secret ingredient is love (but the cinnamon helps too).
Why You'll Love This Recipe
- No-Roll Crust Magic: That flaky, buttery top comes together with just flour and cold butter—no fancy techniques. I swear, even if you burn the first one (it happens), the second attempt will have you hooked by the golden edges.
- Cinnamon-Sugar Hug: The moment those warm spices hit your tongue—brown sugar caramelizing with cinnamon—it’s like a warm embrace. Honestly, I’ve made it for breakfast, dessert, and even as a snack, and it never lets me down.
- Leftovers That Last: This pie stays fresh for days, and the best part? Slices reheated in the oven taste just as good as day one. Between us, my kids beg for seconds, and I never have to worry about waste.
- Budget-Friendly Baking: You’re using pantry staples—flour, sugar, butter—nothing fancy. I’ll be real: my grocery bill stays low, but the taste? It’s the kind of pie that makes you forget you’re saving money.
Step-by-step instructions for grandma's pie recipe
Here's how to create a flaky crust and spiced apple filling that tastes just like grandma's kitchen.
Prepare the Perfect Pie Crust
In a large bowl, combine the 3 cups all-purpose flour, 1 tsp salt, and 1 cup cold cubed unsalted butter. Use a pastry cutter or your fingers to work the butter into the flour until the mixture resembles coarse crumbs with pea-sized butter pieces remaining. This texture is crucial for creating flaky layers.
Add the 0.25 cup ice water, 1 tbsp at a time, mixing gently with a fork until the dough just comes together. Be careful not to overmix—just until it holds when pressed. Divide the dough into two equal discs, flatten slightly, wrap in plastic, and chill in the refrigerator for at least 1 hour. This resting time prevents shrinking and ensures a tender crust.
Make the Spiced Apple Filling
Preheat your oven to 375°F. Peel, core, and slice the 6 medium apples into ¼-inch thick slices. Toss them immediately with 2 tbsp lemon juice to prevent browning. In a large bowl, combine the apples with 0.75 cup granulated sugar, 0.5 cup packed light brown sugar, 2 tbsp ground cinnamon, 0.5 tsp ground nutmeg, and 1 tsp vanilla extract. Mix gently but thoroughly to coat each apple slice evenly.
Let the filling sit for 15 minutes while you roll out the crust. This resting time allows the spices to meld with the apples and the sugars to begin caramelizing slightly, creating deeper flavor. You'll notice the mixture turning a beautiful golden hue and smelling like autumn in a bowl.
Assemble the Pie
On a lightly floured surface, roll out one dough disc into a 12-inch circle to form the bottom crust. Transfer it carefully to a 9-inch pie dish, pressing gently to shape it into the bottom and sides. Trim any excess dough hanging over the edge. Sprinkle the bottom crust lightly with 0.5 cup all-purpose flour to prevent sticking.
Pour the apple filling into the prepared crust, mounding it slightly in the center. Roll out the second dough disc and place it over the filling. Trim and crimp the edges with a fork or your fingers to seal. Cut 4-5 slits in the top crust to allow steam to escape. This prevents a soggy bottom and helps create that classic lattice effect when baked.
Bake to Golden Perfection
Place the assembled pie on a baking sheet (to catch any drips) and bake at 375°F for 50-60 minutes, or until the crust is deep golden brown and the filling is bubbling through the slits. The edges should be crisp, and the filling should be tender but not mushy.
I like to tent the pie loosely with aluminum foil after 30 minutes to prevent over-browning if your oven runs hot. When the crust reaches that beautiful mahogany color and smells like cinnamon and apples, it's ready. Let the pie cool for at least 2 hours before slicing—this allows the filling to set and makes for cleaner slices.
Pro Tips For Making Grandma Pie
- CHILL THE BUTTER FIRST: Cold butter makes flaky crusts—no exceptions. Cut that block into cubes and stick it in the fridge for 30 minutes before mixing with flour. I’ve tried room-temp butter, and while it’s easier to handle, the crust turns out dense and greasy. Trust me, the wait pays off.
- WEIGH YOUR FLOUR: Scooping flour from the bag packs in air, which means your crust will be dry and crumbly. Use a kitchen scale for precision—aim for 250 grams of all-purpose flour. My grandmother measured by volume, but I switched after noticing her crusts always needed extra water to bind. No more guesswork.
- BROWN THE SUGAR: Skip the pre-packaged brown sugar—it’s too fine and lacks depth. Lightly toast your own by spreading it on a baking sheet at 300°F (150°C) for 8–10 minutes, stirring once. The caramelized edges add a rich, buttery note that cuts through the cinnamon. Yes, it’s an extra step, but the flavor difference is worth it.
- STEAM THE CRUST EDGE: Brush the bottom crust with cold water before adding filling, then bake for 5 minutes at 375°F (190°C) before filling. The steam creates a seal that prevents sogginess—no more leaky, gummy crusts. I learned this after a disastrous Thanksgiving pie where the filling oozed out like a sad puddle.
Make-ahead tips for grandma pie
Prep Ahead Like Grandma
Grandma knew the secret to stress-free baking: prep everything the night before. Start by making the pie dough and chilling it overnight in the fridge. This gives the gluten time to relax, making rolling out the crust a breeze.
I always wrap the dough tightly in plastic wrap and place it in a large freezer bag for easy storage. The filling can also be prepped ahead—just toss the sliced apples with spices and store them in an airtight container in the fridge.
This way, you only need to assemble and bake on the day of serving. 💫
Freezer-Friendly Crust
If you're really planning ahead, you can freeze the rolled-out crusts! After rolling out the dough, wrap each disc tightly in plastic wrap and place them between two sheets of parchment paper. Freeze for up to 3 months. When ready to use, thaw in the fridge overnight.
I’ve done this for Thanksgiving pies, and it saves so much time on the actual baking day. Just let the crust sit at room temperature for 10-15 minutes before assembling to make rolling easier.
Filling Prep Shortcuts
Peeling and slicing apples can be tedious, but there’s a trick: use a mandoline slicer for even, thin slices in minutes. If you’re short on time, buy pre-sliced apples from the store—they’re often pre-peeled and ready to go.
For extra convenience, mix the dry ingredients (sugars and spices) in a small bowl ahead of time. Store them in a small mason jar so you can dump them directly into the filling when you’re ready to assemble. This keeps your prep day organized and efficient.
Assemble the Night Before
Here’s my favorite time-saver: assemble the pie the night before baking. After crimping the edges, cover the pie loosely with plastic wrap and refrigerate overnight. This allows the filling to meld with the crust, creating deeper flavors.
When you bake it the next day, the pie will have that restaurant-quality taste. Just make sure to let it sit at room temperature for 30 minutes before baking to prevent condensation from making the crust soggy. Trust me, this step is a game-changer for busy days. ✨
Baking on a Busy Day
If you’re hosting and need to bake during the day, use the oven’s warm setting to keep the pie warm while you finish other preparations. Most ovens have a warm setting (around 170°F), which is perfect for holding pies for up to 2 hours.
Alternatively, place the baked pie on a wire rack inside a large cooler with a towel draped over it to keep it warm. This way, you can focus on your guests while the pie stays fresh and delicious. 🍂
Make Mini Pies for Parties
For gatherings, consider making mini pies ahead of time. Use 6-inch pie pans or even ramekins for individual servings. These bake faster (about 30-40 minutes) and can be assembled and refrigerated just like the full-size pie.
Bake them fresh before serving, or reheat in a 350°F oven for 10-15 minutes to restore that golden crust. Mini pies are perfect for potlucks because they’re easy to transport and serve. Plus, they’re just as nostalgic as the classic version! 🎉
Nutrition facts
Frequently asked questions
Can I use a different type of fruit in Grandma's pie recipe?
This recipe works beautifully with pears, berries, or even cherries—just adjust the sugar slightly. For tart fruits like rhubarb, reduce sugar by 0.25 cup and add 1 tbsp lemon juice to balance flavors. The spice blend (cinnamon and nutmeg) pairs especially well with apples and pears, but you can swap in cardamom or allspice for berry fillings.
Why does my pie crust turn out tough instead of flaky?
Overworking the dough or using warm butter are the most common culprits. Always keep your butter cold and cubed (not melted), and handle the dough minimally. Another trick: wrap the chilled dough in plastic and refrigerate for at least 1 hour before rolling. If your crust still turns out tough, try adding 1 tablespoon of ice water to the dough or using 1 tablespoon of vinegar instead of plain water.
How do I fix a soggy bottom crust?
Prevent it by blind-baking the bottom crust for 15 minutes before adding filling, or sprinkle 0.5 cup all-purpose flour or crushed cornflakes on the bottom crust before filling. If it's already soggy, try this: slice off the top layer of filling, brush the crust with egg wash, and bake at 350°F for 10-15 minutes to crisp it up. For future pies, always preheat your pie dish in the oven for 5 minutes before adding the crust.
Can I make this pie ahead of time?
Yes! Assemble the pie (unbaked) the night before and refrigerate. Bake it fresh the next day for the best texture. For a fully baked pie, let it cool completely, then wrap tightly in plastic wrap. Store in the fridge for 3-4 days or freeze for up to 3 months. To reheat, bake at 350°F for 15 minutes covered with foil, then uncover for the last 5 minutes to restore that golden crust.
What's the secret to a perfect lattice crust?
Cut the top crust into 1-inch strips (like french fries), then weave them over the filling in a basketweave pattern. For extra stability, brush the strips with egg wash before baking. Pro tip: Chill the lattice strips for 10 minutes before placing them on the pie to prevent sagging. If you're nervous about cutting cleanly, use a pastry wheel or even a sharp knife. The lattice not only looks stunning but also creates perfect steam vents for a tender filling.