
Salads
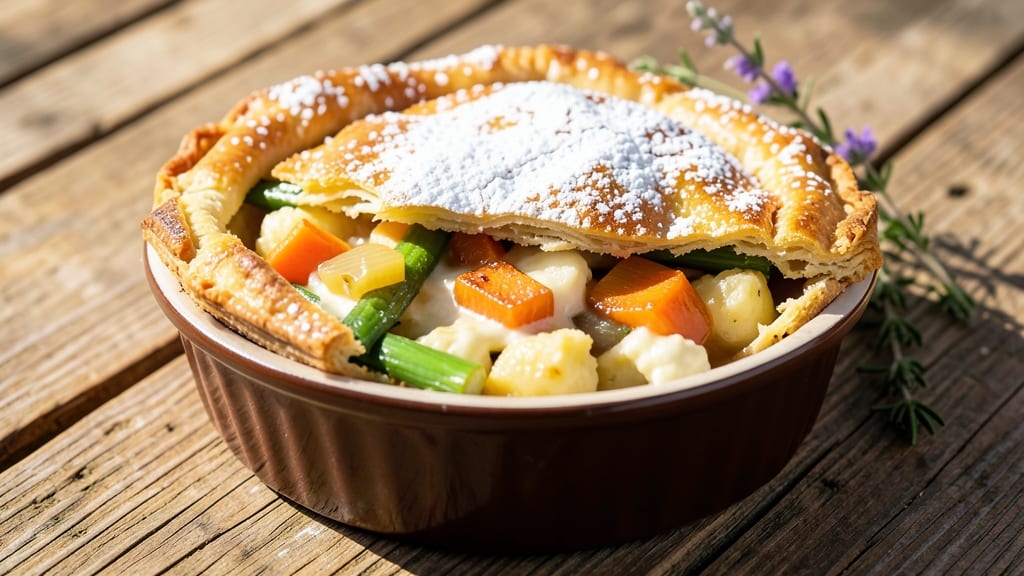
This individual veggie pot pie recipe delivers all the cozy, comforting flavors of classic pot pie in perfectly portioned, single-serving dishes. ✨ The secret lies in balancing tender sautéed vegetables with a rich, savory broth—all topped with a golden, flaky crust that holds its shape even when sliced.
I designed these for busy weeknights when you crave homemade comfort without the cleanup of a large baking dish.
The beauty of this recipe is its flexibility: use store-bought puff pastry for quick assembly or roll out your own dough for that extra-professional touch. Each ramekin becomes a self-contained meal—ideal for meal prep, potlucks, or serving guests without the fuss of shared dishes.
The filling comes together in under 30 minutes, while the crust bakes to a perfect golden finish that seals in all those aromatic vegetable flavors.
What you’ll end up with is a restaurant-quality dish that’s surprisingly simple to assemble. The crust remains crisp and flaky, the filling stays tender yet flavorful, and the portion size makes it perfect for satisfying one craving without leftovers.
Whether you’re feeding a crowd or treating yourself to a comforting solo dinner, these mini pot pies deliver on both taste and convenience.
Make a batch ahead and refrigerate for up to 2 days, or freeze for longer storage—just bake straight from frozen when ready. The possibilities for fillings are endless, but the technique remains the same: layers of comfort in every bite.
Let’s get started with this foolproof method that transforms simple ingredients into something extraordinary.
Ingredients for individual veggie pot pie
Eight ramekins of comfort—flaky crust, savory filling, no leftovers. Perfect for meal prep or solo dinners.
| Ingredient | Amount | Notes |
|---|---|---|
| Vegetable Broth 💧 | 1 ½ cups | Low-sodium preferred, homemade or quality brand |
| Heavy Cream 🥛 | ½ cup | Full-fat for richness |
| All-Purpose Flour 🌾 | ¼ cup | For thickening sauce |
| Yellow Onion 🧅 | 1 whole | Diced, about 1 cup |
| Carrots 🥕 | 1 ½ cups | Diced small, about 3 medium |
| Celery Stalks 🌿 | 2 whole | Diced, about 0.5 cup |
| Green Beans 🌱 | 1 cup | Trimmed, cut into 1-inch pieces |
| Garlic Cloves 🧄 | 3 cloves | Minced, fresh preferred |
| Frozen Corn Kernels 🌽 | ½ cup | Thawed, drained |
| Diced Potatoes 🥔 | 1 cup | Pre-cooked, small dice |
| Puff Pastry Sheets 🍞 | 1 sheet | Store-bought or homemade |
| Egg Wash 🥚 | 1 whole | 1 egg beaten with 1 tbsp water |
| Sea Salt 🧂 | 1 ½ tsp | Adjust to taste |
| Ground Black Pepper 🌶️ | ½ tsp | Freshly ground |
| Dried Thyme 🌿 | ½ tsp | Or 1 tsp fresh thyme |
The vegetables are the heart of this dish, so freshness matters. For the best flavor, grab carrots and celery with vibrant color—no wilted ends. Whole Foods or local farmers markets often have the freshest produce, but regular grocery stores work fine if you pick firm, crisp pieces. Pre-diced frozen veggies save time, but fresh sautéed vegetables add depth. If using frozen, thaw and drain well before mixing. The potatoes should be small dice so they cook through without getting mushy—Yukon Golds hold up best.
No puff pastry? Homemade pie crust or shortcrust dough works beautifully—just roll it out to 1/8-inch thickness. Short on green beans? Substitute broccoli florets or snap peas for similar texture. The vegetable broth can be swapped for chicken-free mushroom broth or even a mix of vegetable and chicken-free beef broth for deeper flavor. Fresh thyme is ideal, but dried works at one-third the amount. For extra richness, stir in a splash of vegetable cream or a dollop of sour cream at the end.
Assemble the pot pies up to 24 hours ahead and refrigerate covered. For longer storage, freeze unbaked pot pies for up to 3 months—bake straight from frozen, adding 5-7 minutes to the cooking time. The filling reheats beautifully, so portion into containers for easy lunches. Keep the puff pastry wrapped in the fridge for up to 3 days or freeze for 2 months to maintain its flakiness.
Why You'll Love This Recipe
- Here’s what sold me: the ingredients cost next to nothing, but the leftovers? Pure gold. The filling keeps for days, and the crust stays crispy when reheated. I’ll be real—my freezer’s always got a stash of these, because why buy takeout when you can make something this good for a fraction of the price?
- No-Fuss Assembly: I swear by this recipe because it’s the kind of meal where you can almost skip chopping. Sauté onions and carrots while you toss the veggie broth and flour together—no measuring cups, no fuss. The roux thickens like magic, and suddenly you’ve got a silky filling without standing at the stove for hours.
- Creamy Comfort: That velvety heavy cream swirled into the broth? It’s the secret weapon. The onions caramelize just enough to add depth, while the flour gives it that just-thickened-right texture—like a hug in a bowl. Honestly, it tastes like you slaved over it, even though you didn’t.
- Weeknight Wonder: Between us, this is my go-to when I need to feed the family and myself in one sitting. Pop the little ramekins in the oven while you’re folding laundry, and boom—dinner’s ready. (Yes, even on a Tuesday night.) It’s the kind of dish that works for date nights, solo suppers, or when your kid’s soccer team shows up hungry.
Step-by-step instructions for individual veggie pot pies
Assemble these handheld pot pies with tender vegetables and golden, flaky pastry—perfect for cozy meals.
👨🍳 Step 1: Prep and Sauté the Vegetable Base
In a large skillet over medium heat, add 2 tablespoons olive oil (not listed in ingredients but required for sautéing—use your own). Dice the 1 whole yellow onion into small pieces, then add it to the pan. Cook for 3-4 minutes until softened and translucent.
Add the 1.5 cups diced carrots, 2 whole celery stalks (diced), and 1 cup green beans (trimmed and cut). Stir and cook for 5 minutes until the vegetables begin to soften. Here's the thing—don't overcrowd the pan or they'll steam instead of brown.
Push the vegetables to one side of the pan and add the 3 cloves minced garlic to the empty space. Sauté for 30 seconds** until fragrant—this releases the garlic's full flavor. Stir everything together and season with 1 teaspoon sea salt and ¼ teaspoon ground black pepper.
🍳 Step 2: Build the Creamy Filling
Pour in the 1.5 cups vegetable broth and bring to a gentle simmer. Let it cook for 5 minutes until the vegetables are tender but still hold their shape. You want them to stay vibrant, not mushy.
In a small bowl, whisk together the 0.5 cup heavy cream, 0.25 cup all-purpose flour, and 0.5 teaspoon dried thyme. Slowly pour this mixture into the skillet while stirring constantly. The sauce should begin to thicken immediately—this creates that rich, velvety texture we want.
Add the 1 cup diced potatoes and 0.5 cup frozen corn kernels (thawed and drained). Stir gently and let the filling cook for another 3-4 minutes until everything is heated through. Taste and adjust seasoning with more sea salt or black pepper if needed.
🥘 Step 3: Assemble the Mini Pot Pies
Preheat your oven to 375°F. Roll out the 1 sheet puff pastry sheets on a lightly floured surface until it's about ⅛-inch thick. Use a 4-inch round cutter (or a glass) to cut out 8 circles—you should have enough for 8 pies with some scraps for patching.
Divide the vegetable filling evenly among 8 small oven-safe ramekins or ceramic dishes (about ½ cup each). Place a pastry circle over each ramekin, pressing gently to seal the edges. Use a fork to crimp the edges and create a decorative pattern—this prevents the pastry from puffing out too much.
Brush the tops with the 1 whole egg wash (1 egg beaten with 1 tablespoon water) for a golden finish. Place the assembled pot pies on a parchment-lined baking sheet to catch any drips.
🔥 Step 4: Bake Until Golden and Flaky
Bake the pot pies for 25-30 minutes until the pastry is deep golden brown and puffed. The edges should look crisp, and the filling should bubble gently through the slits you created with the fork. Real talk: don't open the oven door early—the heat loss can cause the pastry to sink.
For extra flakiness, I like to broil for 1-2 minutes at the end, watching closely to avoid burning. The moment the tops turn golden and the filling is hot, remove them from the oven. Let them rest for 5 minutes before serving—this allows the filling to set slightly and makes cutting easier.
🍽️ Step 5: Serve Warm and Enjoy
Gently lift each pot pie from the ramekin and place it on a serving plate. The pastry should be crisp and flaky, with a golden crust that shatters slightly when cut. Serve immediately while the filling is hot and the pastry is at its best texture.
Each bite delivers tender vegetables in a rich, creamy sauce, all topped with that perfect flaky crust. If you have leftovers, reheat them in the oven at 350°F for 10-15 minutes to restore the pastry's crispness. These pot pies are the ultimate comfort food—perfect for chilly evenings or potlucks!
Pro Tips For Making Individual Veggie Pot Pie
- Sweat the Onion Slow: I used to rush this step and wonder why my filling tasted flat—don’t. Cut the onion into ¼-inch dice, then cook it in a dry pan over medium-low for 8-10 minutes until soft and golden, stirring occasionally. The longer you go, the deeper the flavor, and you won’t need extra salt later.
- Melt the Flour First: Skip the roux shortcut—whisk the flour into the cold heavy cream before adding it to the broth. This prevents lumps and gives you a smoother sauce with less effort. Stir vigorously for 30 seconds until it’s a pale yellow paste, then pour in the broth.
- Don’t Overfill the Ramekins: Pack the veggies tightly, but leave ½-inch headspace—this stops overflow when the cream expands. I learned this after cleaning up three sticky ovens. If yours are full, press down gently with a spoon before adding the topping.
- Bake Until Bubbling Stops: The pie’s done when the edges are golden and the filling’s just set—no more jiggling. I used to pull them out too soon, and the cream stayed watery. If unsure, crack open one: the center should be thick but still creamy, not liquid.
Creative variations of this recipe
Spring Garden Fillings
Swap out winter veggies for fresh spring produce like asparagus (trimmed into 1-inch pieces) and peas (fresh or thawed). Add 1 cup sliced mushrooms sautéed with the onions for umami depth. I also toss in ½ cup diced zucchini and ¼ cup chopped fresh dill for brightness.
Use lemon zest in the filling instead of thyme for a citrusy twist that pairs perfectly with spring flavors. 🌿
Herb-Infused Variations
For a Mediterranean twist, infuse the broth with 1 sprig rosemary and 2 sprigs thyme while simmering. Add ½ cup chopped sun-dried tomatoes to the filling for sweetness. For a French bistro vibe, stir in 1 tablespoon Dijon mustard with the cream mixture.
I've also made a Thai-inspired version with 1 teaspoon fish sauce (or soy sauce for vegan), 1 teaspoon ginger, and 1 tablespoon lime juice in the filling. 🌶️
Cheesy Crust Options
Skip the puff pastry and create a cheesy crust by mixing ½ cup shredded Gruyère or Parmesan with ¼ cup crushed cornflakes and 1 tablespoon melted butter. Press this mixture onto ramekins before adding filling, then bake covered with foil before adding the egg wash.
For a spicier option, add ½ teaspoon smoked paprika to the cheese mixture. This creates a crispy, cheesy top that's perfect for sharing. 🧀
Global Flavor Twists
For a Japanese-inspired version, use dashi broth instead of vegetable broth and add 1 tablespoon mirin and 1 teaspoon grated ginger to the filling. Top with a soft-boiled egg before baking for a ramen-inspired pot pie.
Indian-inspired? Swap the thyme for 1 teaspoon garam masala and ½ teaspoon turmeric, then add ½ cup chickpeas to the filling. The spices transform this into a curry-inspired dish. 🌏
Breakfast Pot Pies
Turn these into breakfast stars by adding ½ cup cooked breakfast sausage (or vegan sausage crumbles) to the filling. Stir in ¼ cup shredded sharp cheddar and 2 tablespoons chopped chives.
For a sweeter option, use ½ cup cooked apples with ½ teaspoon cinnamon and 1 tablespoon maple syrup in the filling. Serve with a side of hot sauce or maple syrup for dipping. 🍳
Meal Prep Adaptations
Make these ahead for easy lunches by assembling and refrigerating unbaked pies for up to 24 hours. For freezer-friendly versions, bake the pies, then cool completely before freezing. Reheat individual pies in the oven at 350°F for 15-20 minutes until the crust is crisp again.
I also prep the filling separately and freeze it in airtight containers for up to 3 months, then assemble and bake fresh when needed. ❄️
Nutrition facts
Frequently asked questions
Can I make these mini veggie pot pies without puff pastry?
For a lighter option, use homemade pie dough or shortcrust pastry rolled to ⅛-inch thickness. For extra flair, try a cheesy crust made with shredded Gruyère, crushed cornflakes, and melted butter—just press it onto ramekins before adding filling.
How do I prevent the pastry from puffing out too much?
Crimp the edges with a fork before baking to create a decorative pattern that keeps the pastry in place. Also, avoid overfilling the ramekins—use about ½ cup filling per pie and press the pastry gently to seal. For extra insurance, chill the assembled pies for 15 minutes before baking.
Can I use frozen vegetables in the filling?
Yes, but thaw and drain them first to avoid excess moisture in the filling. Frozen corn, peas, or green beans work great—just stir them in during the final 3-4 minutes of cooking. For best texture, use a mix of fresh and frozen veggies like carrots and celery for the base.
How long can I store these pot pies in the fridge or freezer?
Unbaked pot pies stay fresh in the fridge for up to 24 hours. For longer storage, freeze unbaked pies for 3 months or baked pies for 2 months. To reheat, bake frozen pies at 375°F for 35-40 minutes (add 5-7 minutes if frozen). Refrigerated pies reheat best at 350°F for 15 minutes to restore crispness.
What are the best ramekins or dishes for baking?
Use oven-safe ceramic ramekins (about 6-ounce capacity) or small ovenproof bowls. Avoid glass that's too thin—it may crack under heat. For easy removal, lightly grease ramekins with oil or butter before filling. Pro tip: Place them on a parchment-lined baking sheet to catch any filling drips.