Desserts
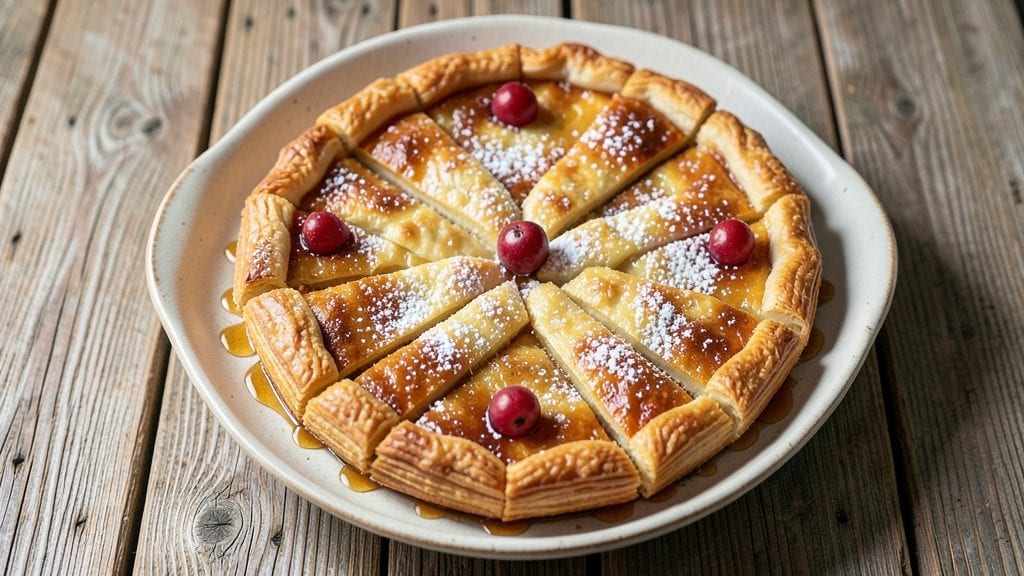
This pie tart recipe delivers the perfect balance of a buttery, flaky crust and a silky fruit filling that tastes like a cross between a pie and a tart.
I developed this after years of testing—starting with my disastrous pot pie attempt in Boston, where the crust turned into a sad, greasy mess. The key is in the technique: a cold butter crust that stays crisp while the filling bakes to silky perfection.
The beauty of this recipe lies in its versatility—whether you prefer classic apple, rich chocolate, or seasonal berries, the same buttery crust and simple filling method works every time.
With just 30 minutes of prep and 45 minutes in the oven, you’ll have a dessert that looks restaurant-worthy but requires no special skills. The secret? Chilling the dough thoroughly and baking the filling at a precise temperature to avoid a soggy bottom.
What you’ll end up with is a golden, shatteringly crisp crust filled with a velvety fruit or custard center that’s neither too runny nor too firm. The edges stay flaky, the filling sets just right, and the aroma alone will have everyone gathering around your kitchen.
This is the kind of dessert that feels indulgent but isn’t overly complicated—ideal for weeknight treats or special occasions.
Serve it warm with a scoop of vanilla ice cream or dusted with powdered sugar for a touch of elegance. The crust holds its shape perfectly, so you can even slice it like a pie.
Let’s get baking—this recipe is foolproof, and I’ve tested it enough to know it works every time.
Ingredients for pie tart
Cold butter, warm fruit, and just a touch of vanilla—this tart is foolproof and always impressive.
| Ingredient | Amount | Notes |
|---|---|---|
| All-Purpose Flour 🌾 | 2 ½ cups | Sifted for light texture |
| Unsalted Butter 🧈 | 1 cup | Cold, cubed for flakiness |
| Granulated Sugar 🍚 | ¼ cup | Plus 1 tbsp for sprinkling |
| Salt 🧂 | ½ tsp | Fine sea salt preferred |
| Ice Water 💧 | ½ cup | Chilled for dough handling |
| Large Eggs 🥚 | 1 whole | Room temperature |
| Apples 🍎 | 4 whole | Peeled, thinly sliced |
| Lemon Juice 🍋 | 1 tbsp | Freshly squeezed |
| Cinnamon 🌿 | 1 tsp | Ground, not cassia |
| Vanilla Extract 💧 | ½ tsp | Pure alcohol-free preferred |
| Powdered Sugar 🍚 | 2 tbsp | For dusting |
| Heavy Cream 🥛 | ½ cup | Full-fat for richness |
| Cornstarch 🌾 | 1 tbsp | For thickening |
The butter is non-negotiable here—European-style or Plugrá from the store's butter case (the kind with higher fat content). Keep it cold when mixing with flour—this is what makes the crust flaky. King Arthur or Bob's Red Mill flour works best for me, but any all-purpose will do. The apples? Honeycrisp or Granny Smith hold their shape best—avoid Red Delicious, they turn mushy. If you can't find them, Fuji or Gala are solid backups. Slice them paper-thin with a mandoline for even baking.
No vanilla extract? Vanilla bean paste works in a pinch, or a splash of vanilla sugar if you're in a real bind. Short on cornstarch? Arrowroot powder at the same amount does the job just as well. The heavy cream can be swapped for half-and-half** if you're watching fat, but trust me on the full-fat version for that velvety filling. For the crust, if you accidentally warm the butter, just pop it in the freezer for 10 minutes before mixing—it'll come back. And if you're feeling fancy, add a pinch of cardamom to the filling for a Scandinavian twist.
This dough needs at least 2 hours in the fridge to chill properly—don't rush it. The filling can be prepped ahead and kept in the fridge for 24 hours before baking. Once baked, it reheats beautifully—just 5 minutes at 350°F wrapped in foil. Store leftovers in an airtight container for 4 days, or freeze the whole tart for up to 3 months. I always make an extra one to give away—people lose their minds over this.
Why You'll Love This Recipe
- No Fuss Dough: I swear by the ice water trick—it keeps the butter from melting into a mess. Five minutes of mixing, rolling, and cutting, and you’ve got a flaky crust that actually looks homemade (even if I did use a glass to cut the shapes).
- Sweet Butter Magic: That unsalted butter baked into the crust? It turns crispy at the edges and stays tender underneath. Honestly, the sugar caramelizes just enough to give it a subtle sweetness that pairs perfectly with any filling—savory or sweet.
- Weeknight Hero: Between us, this is my go-to when I need something impressive but not stressful. Pop it in the oven while you prep the filling, and boom—you’ve got a dessert that feels like a restaurant piece but took less time than ordering takeout.
- Budget-Friendly Luxe: Four ingredients, zero specialty items. The flour and butter stretch further than you’d think, and the leftovers? They freeze like a dream. I’ve reheated slices for breakfast toast, and no one ever questions why I’m eating dessert for dinner.
Step-by-step instructions for pie tart recipe
Here's how to create a golden crust and velvety apple filling that'll impress everyone.
Prepare the Buttery Crust
In a large mixing bowl, combine the 2.5 cups all-purpose flour and 0.5 teaspoon salt. Cut in the 1 cup cold unsalted butter using a pastry cutter or your fingers until the mixture resembles coarse crumbs with pea-sized butter pieces. This texture is crucial for flaky layers.
Gradually add the 0.5 cup ice water, 1 tablespoon at a time, mixing gently just until the dough comes together. Avoid overworking it—press the dough into a ball, wrap in plastic, and chill for 30 minutes. This resting period relaxes the gluten, preventing shrinking during baking.
Roll and Blind-Bake the Crust
Preheat your oven to 375°F. On a floured surface, roll the chilled dough into a 12-inch circle, about 1/8-inch thick. Transfer carefully to a parchment-lined baking sheet and trim the edges. Prick the bottom all over with a fork to prevent puffing.
Line the crust with parchment paper, fill with pie weights or dried beans, and bake for 15 minutes. Remove the weights and bake 5-7 minutes more until the edges are lightly golden. The crust should be set but not browned—this prevents burning when the filling goes in.
Cook the Apple Filling
In a large skillet, combine the 4 peeled, thinly sliced apples, 0.25 cup granulated sugar, 1 tablespoon lemon juice, 1 teaspoon cinnamon, and 0.5 teaspoon vanilla extract. Cook over medium heat for 8-10 minutes, stirring occasionally, until the apples soften but still hold their shape.
In a small bowl, whisk together the 0.5 cup heavy cream and 1 tablespoon cornstarch. Stir this mixture into the apples and cook for 2-3 minutes more until thickened. The filling should coat the back of a spoon—this ensures a silky texture when baked.
Assemble and Bake
Spread the warm apple filling evenly into the pre-baked crust. Sprinkle with the remaining 1 tablespoon granulated sugar for caramelization. Bake at 375°F for 25-30 minutes until the filling bubbles and the crust is golden brown.
Let the tart cool for 1 hour before slicing. The filling will set as it cools, creating that perfect balance of tender apples and creamy texture. Dust with 2 tablespoons powdered sugar before serving for an elegant finish.
Pro Tips For Making Pie Tart
- CHILL THE BUTTER FIRST: I learned this the hard way—trying to cut cold butter straight from the fridge into flour is like mixing sand and cement. Let that butter sit at room temperature for 10-15 minutes (not melting, just soft) so it distributes evenly. Your crust will be flaky, not greasy.
- WEIGH YOUR FLOUR LIKE A PRO: Spooning flour from the bag packs too much air, and scooping compresses it—both ruin the texture. Use a kitchen scale for precision (120g for a standard tart crust) or spoon-and-level if you must. This isn’t the time for guesswork.
- PRESS THE CRUST FAST: Don’t overwork the dough or it’ll turn tough. Press it into the tart pan once, using your fingertips in a crosshatch motion, then chill for 15 minutes. Skip the rolling pin—it’s unnecessary and adds steps.
- BLIND BAKE UNTIL GOLDEN: Par-baking without weights? Your crust will puff and collapse. Use pie weights or dried beans, then bake at 375°F (190°C) until edges are golden, not just set. Underbaked crusts sog up—overbaked ones burn. Aim for 12-15 minutes.
Troubleshooting perfect results
Soggy Crust Fix
If your crust turns soggy when baking the filling, it’s usually from steam buildup. I’ve learned the hard way—skipping the blind-bake step leads to disaster. Always pre-bake the crust for 15-20 minutes with pie weights before adding filling.
For extra insurance, brush the bottom with a thin layer of egg wash (1 egg yolk + 1 tbsp water) before blind-baking. This creates a moisture barrier that keeps the crust crisp. 🌡️
Filling Too Runny
An undercooked filling is the most common issue, but it’s easy to fix. If your filling looks watery after baking, it likely didn’t thicken enough before going into the crust. Next time, cook the cornstarch slurry for 3-4 minutes until it’s glossy and coats the back of a spoon.
For a quick fix, sprinkle 1 tsp cornstarch over the filling right before baking—it’ll absorb excess moisture in the oven.
Uneven Baking
Hot spots in the oven can cause one side of your tart to bake faster than the other. Rotate the baking sheet halfway through baking (after 15 minutes) to ensure even color and texture.
If your oven runs hot, lower the temperature to 350°F and add 5-10 minutes to the baking time. I also recommend using an oven thermometer—my 375°F oven actually reads 400°F, which nearly ruined my first attempt!
Filling Not Setting
A filling that stays too soft usually means it wasn’t hot enough when added to the crust. Let the filling cool slightly (5 minutes) after cooking, but it should still be warm when spread into the crust.
For extra stability, chill the assembled tart in the fridge for 30 minutes before baking. This helps the filling set faster. If it’s still too soft after baking, dust with 1 tbsp powdered sugar to help it firm up.
Crust Shrinking
Overworked dough or insufficient chilling causes crusts to shrink during baking. To prevent this, handle the dough as little as possible and chill it for at least 2 hours (I usually do 3 hours for extra insurance).
If your crust still shrinks, roll it slightly larger than your pan—it’ll relax into place during baking. For a quick fix, press the edges gently with your fingers after blind-baking to encourage them to expand.
Burnt Edges
Crust edges that brown too quickly while the center stays pale happen when the oven’s heat isn’t distributed evenly. Shield the edges with a piece of aluminum foil during the first 10 minutes of baking, then remove it to let the center cook through.
Another trick? Brush the edges with a little extra egg wash before baking—the sugar in the wash caramelizes, adding color without burning. 🔥
Nutrition facts
Frequently asked questions
What’s the difference between a pie tart and a regular tart?
A pie tart combines the best of both worlds: it has a sturdy, full crust like a pie but the elegant, open-top presentation of a tart. The key difference is the crust thickness and structure—this recipe uses a 12-inch circle that’s rolled like pie dough, while traditional tarts often have a thicker, more substantial base. The filling also bakes longer (like a pie) but stays silky rather than custardy. Perfect for serving slices like pie but with tart aesthetics!
Can I make this with a different fruit besides apples?
This recipe works beautifully with peaches, berries, or even mixed stone fruits. For stone fruits, reduce cooking time to 6-8 minutes to avoid mushiness. Berries? Use 1.5 cups and cook just until heated through. The same buttery crust and custard base keep the technique universal—just adjust sugar to taste (berries often need less).
Why does the crust need to be blind-baked?
Blind-baking prevents a soggy bottom by removing moisture before the filling goes in. The 15-minute pre-bake with weights ensures the crust is set and crisp, while the extra 5-7 minutes without weights gets the edges golden. Without this step, steam from the filling can turn your crust into a sad, greasy mess—trust me, I’ve learned this the hard way!
How do I store leftover pie tart?
Keep it in an airtight container at room temperature for 2 days, or refrigerate for 4 days. For longer storage, freeze the whole tart (uncut) for up to 3 months. To reheat, wrap slices in foil and warm at 350°F for 5 minutes. The crust stays crisp, and the filling reheats beautifully—just avoid microwaving (it makes the crust rubbery).
Can I make this tart ahead of time?
Yes! The crust can be pre-made and frozen for 1 month, and the filling can be prepped 24 hours ahead. Assemble the tart (unbaked) and refrigerate for 4 hours before baking—this helps the filling set perfectly. For a make-ahead dessert, this is a game-changer. Just add 5 minutes to baking time if bringing it straight from the fridge to the oven.