
Main Courses
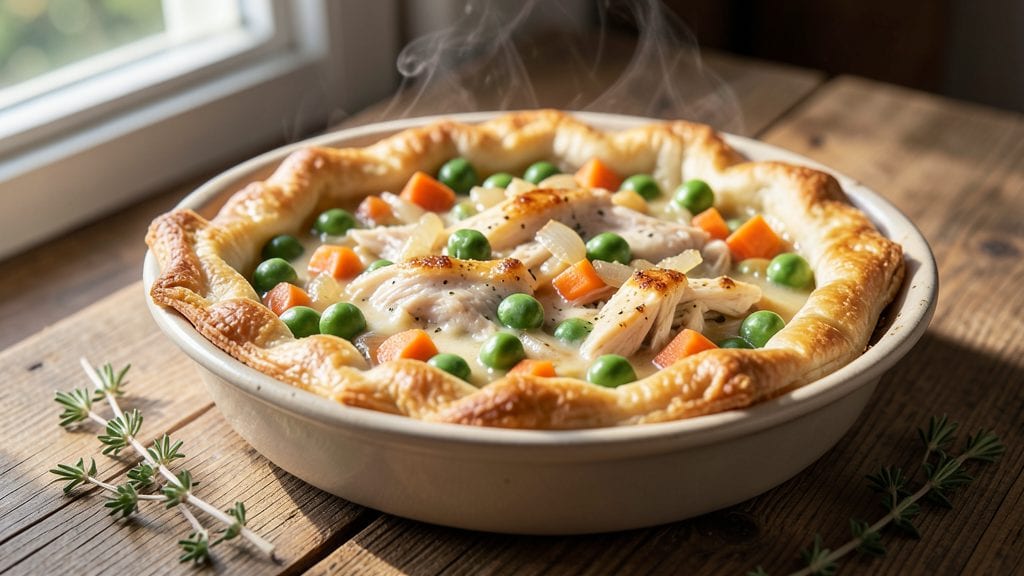
Creating Campbell's mini pot pies transforms a simple pantry staple into a comforting, restaurant-worthy meal that’s surprisingly easy to master. The secret lies in balancing the creamy, savory filling with a perfectly flaky crust—no advanced baking skills required.
I’ve perfected this recipe over years of testing, ensuring every bite delivers that satisfying contrast of tender filling and crispy edges.
This recipe leverages Campbell’s classic soup as the base, which cuts prep time while delivering that familiar, comforting flavor. Using pre-made pie crusts ensures flaky results without the hassle of rolling dough, making it ideal for weeknights or gatherings.
The filling’s creamy texture pairs beautifully with the buttery, golden crust, creating mini pies that disappear faster than you can say "seconds."
Once baked, these mini pot pies emerge from the oven with golden, bubbling crusts that crack open just enough to reveal the rich, savory filling beneath. The aroma alone will have everyone gathering around the table, and the handheld size makes them perfect for parties or a cozy family dinner.
Whether served warm with a side salad or as a hearty appetizer, they’re guaranteed to impress.
For extra crispiness, brush the crusts with melted butter before baking, and don’t overfill the crusts—this ensures they puff up beautifully. Serve immediately for the best texture, or reheat in the oven to restore that golden sheen.
The versatility of Campbell’s soup also means you can customize flavors to suit any occasion.
Ingredients for campbell's mini pot pie
Pantry staples meet flaky perfection—just 13 ingredients for mini pot pies that taste restaurant-worthy.
| Ingredient | Amount | Notes |
|---|---|---|
| Campbell's Cream of Chicken Soup 🍲 | 2 cans | Condensed, unsalted variety preferred |
| Heavy Cream 🥛 | ½ cup | Full-fat for rich texture |
| Shredded Chicken Breast 🍗 | 1 ½ cups | Rotisserie or poached, no skin |
| Frozen Peas 🌱 | ½ cup | Thawed, no need to drain |
| Diced Carrots 🥕 | ½ cup | Small dice for even cooking |
| Diced Onion 🧅 | ½ cup | Yellow or white, finely chopped |
| Minced Garlic 🧄 | 2 tbsp | Freshly minced for aroma |
| Unsalted Butter 🧈 | ½ cup | Melted for brushing crust |
| Pre-Made Pie Crust 🥧 | 2 sheets | Store-bought, flaky variety |
| All-Purpose Flour 🌾 | 2 tbsp | For dusting work surface |
| Diamond Crystal Kosher Salt 🧂 | ½ tsp | For seasoning filling |
| Freshly Ground Black Pepper 🌶️ | ¼ tsp | Freshly cracked for best flavor |
| Egg Wash 🥚 | 1 whole | 1 egg beaten with 1 tbsp water |
The Campbell's Cream of Chicken Soup is the backbone here—stick with the condensed, unsalted version to control seasoning. Costco or Walmart usually stock it in bulk, but any grocery store carries it. For the shredded chicken, rotisserie is a game-changer (just pick out the skin), but poached works too. The frozen peas and carrots? No need to thaw or drain—just toss them straight from the bag. Minced garlic is non-negotiable for that deep flavor, so grab a head and chop it yourself (or use jarred if you're in a rush, but fresh tastes better).
No heavy cream? Half-and-half or evaporated milk will work, though the texture won't be as rich. Rotisserie chicken not an option? Swap in canned chicken (drained and flaked) or diced deli turkey. The pie crust is where flavor meets flakiness—Pillsbury or Whole Foods brands are solid, but avoid the pre-rolled ones with fillings (they're for savory pies, not mini pot pies). Diamond Crystal kosher salt is key here—it dissolves better than table salt, so don't skip it. Freshly ground black pepper makes a difference, but pre-ground is fine in a pinch.
The filling keeps for 3 days in the fridge, but the crust loses crispiness after 1 day, so assemble these just before baking. Pre-made crusts freeze beautifully—thaw in the fridge overnight before using. Once baked, these reheat like a dream: 350°F for 10-12 minutes until golden. Portion into muffin tins for easy serving, or freeze unbaked pies for up to 2 months—just brush with egg wash before baking from frozen.
Why You'll Love This Recipe
- Pantry Magic: I swear by this when I’m staring into my fridge at 6:30 PM with nothing but a can of soup and a bag of frozen peas. The Campbell’s base does all the heavy lifting—just add cream, chicken, and a handful of veggies, then bake. No fancy prep, no stress.
- Creamy Crisp Contrast: That buttery crust meets the silky chicken-pea filling? It’s the kind of bite that makes you close your eyes. The heavy cream turns the soup into something rich and velvety, while the carrots add just enough sweetness to balance it all.
- Lunchbox Hero: Between us, this is my go-to for school lunches or office meals. Portion it into muffin tins before baking, and you’ve got grab-and-go portions that stay warm (and delicious) for days. My kids actually eat their veggies this way—no complaints.
- Budget Win: Honestly, I could feed my family four meals for the price of one restaurant dinner. Shredded chicken is cheap, frozen peas are a steal, and a can of soup stretches into multiple servings. Leftovers? They reheat like a dream—crispy top, creamy center, every time.
Step-by-step instructions for Campbell's mini pot pies
Here's how to assemble these handheld masterpieces with perfect flaky crusts every time.
Prepare the Savory Filling
In a large skillet, melt the 0.5 cup unsalted butter over medium heat. Add the 0.5 cup diced onion and cook for 3 minutes until softened. Stir in the 2 tablespoons minced garlic and cook for another 30 seconds until fragrant—this builds the flavor foundation.
Add the 0.5 cup diced carrots and 0.5 cup frozen peas, cooking for 2 minutes until the carrots just begin to soften. Pour in the 2 cans Campbell's Cream of Chicken Soup and 0.5 cup heavy cream, stirring to combine. Bring to a gentle simmer and cook for 5 minutes until slightly thickened. Remove from heat and stir in the 1.5 cups shredded chicken breast, 0.5 teaspoon Diamond Crystal kosher salt, and 0.25 teaspoon freshly ground black pepper. Let cool completely before filling—warm filling makes the crust soggy.
Assemble the Mini Pot Pies
Preheat your oven to 375°F. Roll out each sheet of pre-made pie crust on a lightly floured surface using the 2 tablespoons all-purpose flour. Cut each sheet into 12 equal squares (about 3 inches each) using a sharp knife or pizza cutter. You'll need 24 squares total for 12 mini pies.
Place 1 tablespoon of the cooled filling into the center of 12 crust squares. Fold the opposite corners of each square together to form triangles, pressing the edges firmly with a fork to seal. Arrange the assembled pies on a parchment-lined baking sheet, leaving 1 inch between each one for even browning.
Create the Signature Crimp
Brush the tops of all 12 mini pot pies with the 1 whole egg wash (1 egg beaten with 1 tablespoon water). Using a fork, press down firmly along the edges to create a decorative crimp pattern. This not only looks beautiful but also creates a tight seal that prevents leaks during baking.
Bake for 25-30 minutes until the crusts are golden brown and puffed slightly at the edges. The filling should be bubbling gently through the slits in the crust. Remove from oven and let cool for 5 minutes before serving—this resting time lets the filling set while keeping the crusts crisp.
Serve Warm for Maximum Enjoyment
Serve the mini pot pies immediately while still warm. The flaky crusts should be golden and crisp, with just enough give to reveal the creamy chicken filling inside. Each bite should deliver that perfect balance of tender crust and rich, savory filling.
For extra flakiness, I like to brush the baked pies with a little more melted butter before serving. The contrast between the crisp exterior and creamy interior is what makes these mini pot pies irresistible—worth every minute of assembly time.
Pro Tips For Making Campbell'S Mini Pot Pie
- STIR THE SOUP FIRST: I learned this the hard way—just dumping the frozen peas and carrots into the soup mixture and calling it a day leaves you with uneven cooking. Simmer the soup and cream together for 3-4 minutes first, then add the veggies. That way, they absorb flavor instead of just sitting there like wallflowers.
- USE HALF-AND-HALF: Heavy cream can turn grainy when heated, especially in mini pot pies where the filling sits too long in the oven. Swap half of it for whole milk or—better yet—use half-and-half. The fat content stays stable, and the sauce stays silky. (Yes, even if you're impatient like me.)
- DON’T OVERFILL THE CUPS: This isn’t the prettiest method, but it’s the tastiest: fill your ramekins only ¾ full. The filling expands when it bakes, and overflowing means soggy crusts or messy ovens. Trust me, ¾ is the magic number—your crust will thank you.
- TOAST THE CARROTS: Skip the raw, watery carrots—toss them in a dry pan over medium heat for 2-3 minutes before adding to the soup. The edges caramelize just enough to add depth, and they won’t turn to mush when baking. (Does it look weird? Yes. Does it work? Every single time.)
Perfect pairings for this recipe
Classic Side Pairings
Serve these mini pot pies alongside a simple arugula salad tossed with 1 tbsp lemon juice, 2 tbsp olive oil, and 1 tsp honey—the peppery greens cut through the richness beautifully. I also love adding crusty sourdough bread or garlic breadsticks for dipping. 🥗
For a heartier spread, pair with roasted Brussels sprouts tossed in 1 tbsp balsamic glaze and 2 tbsp toasted pecans. The caramelized sprouts add a touch of sweetness that balances the savory filling.
Another favorite is creamy mashed potatoes—just mix 1 lb Yukon Gold potatoes with 4 tbsp butter and ½ cup warm milk for a comforting contrast.
Wine Pairings
A crisp Chardonnay with buttery notes (like La Crema Sonoma Coast) complements the creamy filling perfectly. The acidity helps cleanse your palate between bites. For a lighter option, try a Sauvignon Blanc—its citrusy brightness pairs wonderfully with the chicken and peas. 🍷
If you prefer red wine, a Pinot Noir with soft tannins (like Meiomi) works beautifully. Avoid heavy, bold reds—they can overpower the delicate flavors of the mini pot pies. For a non-alcoholic option, sparkling apple cider adds a refreshing contrast.
Beer Pairings
A wheat beer like Blue Moon or Hoegaarden provides a light, slightly sweet balance to the savory filling. The effervescence helps refresh your palate between bites. For a malty option, try a light lager like Heineken—its crispness cuts through the richness. 🍺
If you're feeling adventurous, a Belgian witbier (like Stella Artois) adds a spicy, citrusy note that pairs surprisingly well with the creamy chicken. Just avoid heavy stouts or IPAs—they can clash with the delicate crust and filling.
Dessert Pairings
End the meal with a light citrus sorbet (like lemon or raspberry) to cleanse your palate. The bright acidity resets your taste buds after the rich pot pies. For something more indulgent, try chocolate-dipped strawberries—the sweetness contrasts perfectly with the savory flavors. 🍓
If you're serving these as appetizers, pair them with mini cheese plates featuring brie, aged cheddar, and crackers. The variety of textures and flavors makes for a well-rounded spread that keeps guests satisfied.
Nutrition facts
Frequently asked questions
Can I make these mini pot pies ahead of time?
Assemble the pies and refrigerate them (unbaked) for up to 24 hours before baking. For longer storage, freeze unbaked pies on a tray, then transfer to a sealed bag for up to 2 months. Bake from frozen, adding 5-7 minutes to the cooking time.
What if my crusts aren't flaky?
Use cold butter in your pre-made crust (if possible) and avoid overworking the dough. Brush with egg wash before baking, and bake at 375°F until golden—don't overbake. For extra flakiness, chill the assembled pies for 20 minutes before baking.
Can I use a different Campbell's soup flavor?
Yes! Try cream of mushroom or cream of celery for a vegetarian version. For a heartier option, use chicken noodle soup and add 1 tbsp flour to thicken the filling. Adjust seasoning as needed—some soups are saltier than others.
How do I reheat leftover mini pot pies?
Place on a baking sheet and warm at 350°F for 10-12 minutes until golden. For microwave reheating, cover with a damp paper towel and heat for 20-30 seconds—this keeps the crust from drying out. Avoid reheating in air fryers (they crisp too much).
Can I make these gluten-free?
Yes! Use a gluten-free pie crust (like King Arthur's) and ensure all ingredients (soup, flour) are certified gluten-free. The filling recipe remains the same—just check labels for hidden gluten. The texture will be slightly different but still delicious!