Main Courses
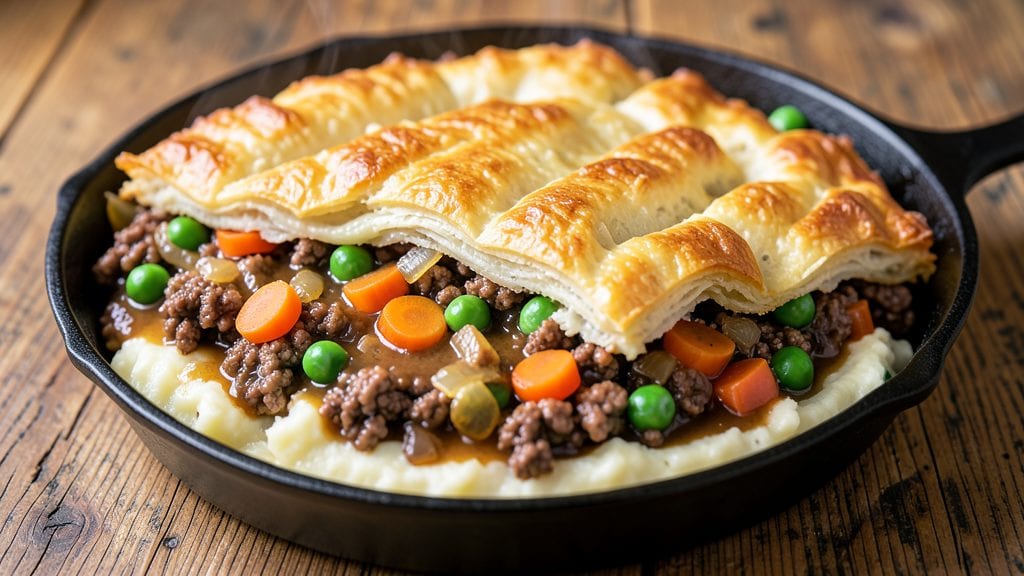
This Bisquick shepherd's pie recipe delivers all the cozy, hearty comfort of a classic shepherd's pie with the convenience of a one-pan meal. The secret lies in that creamy, golden Bisquick mashed potato topping that crisps perfectly while keeping the filling rich and savory.
I've perfected this version to balance texture and flavor—no soggy tops or dry fillings here.
The beauty of this recipe is its simplicity: ground beef or lamb simmers with vegetables in a rich gravy, then gets topped with velvety Bisquick mashed potatoes. The key technique is baking at the right temperature to achieve a crispy, golden crust while keeping the filling tender.
It's the kind of dish that transforms a weeknight into a homey meal without requiring hours in the kitchen.
What makes this shepherd's pie truly special is how the flavors come together—earthy ground meat, sweet carrots and peas, and that creamy, buttery potato topping that melts in your mouth. The Bisquick not only simplifies the mashed potatoes but also adds a subtle richness that elevates the whole dish.
Ready in under an hour, it's perfect for families, game days, or whenever you crave comfort food.
Once you try this version, you'll never go back to store-bought mashed potatoes for shepherd's pie again. The crispy edges and tender filling make every bite satisfying, and the leftovers reheat beautifully. Let's get started on this foolproof, one-pan wonder that brings restaurant-quality comfort to your dinner table.
Ingredients for bisquick shepherd's pie
Six ingredients for the filling, seven for the creamy topping—all you need for cozy comfort.
| Ingredient | Amount | Notes |
|---|---|---|
| Ground Beef 🥩 | 1 ½ lb | 85% lean for rich flavor |
| Yellow Onion 🧅 | 1 whole | Medium size, diced |
| Carrots 🥕 | 3 medium | Peeled and sliced into rounds |
| Frozen Peas 🌽 | 1 cup | Thawed, no need to drain |
| Garlic Cloves 🧄 | 3 cloves | Minced for aromatic depth |
| Beef Broth 💧 | 1 ½ cups | Low-sodium preferred |
| All-Purpose Flour 🌾 | 1 tbsp | For gravy thickening |
| Bisquick Mix 🍞 | 2 cups | Original flavor preferred |
| Milk 🥛 | ½ cup | Whole milk for creaminess |
| Russet Potatoes 🥔 | 4 medium | Peeled and boiled |
| Unsalted Butter 🧈 | ½ cup | Melted for topping richness |
| Sharp Cheddar Cheese 🧀 | ½ cup | Shredded for flavor boost |
| Salt 🧂 | 1 tsp | Kosher or sea salt |
| Black Pepper 🌶️ | ½ tsp | Freshly ground preferred |
| Dried Thyme 🌿 | ½ tsp | Or 1 tsp fresh thyme |
The ground beef is where flavor starts. 85% lean gives you that rich, meaty taste without too much fat—Costco or Walmart usually have it pre-packaged in 1.5 lb bags, which is perfect for this recipe. Look for bright red color and avoid packages with any grayish tinge. The frozen peas? Green Giant or Birds Eye work great, and they're already pre-cut so no chopping. Carrots should be firm and vibrant—skip the wilted ones at the back of the bin. For the Bisquick, original flavor is key; the garlic and herb versions add flavors you might not want to compete with the filling.
No beef broth? Chicken broth plus 1 tbsp Worcestershire sauce gets you close. Fresh thyme is ideal but dried works at half the amount. The cheddar can be skipped if you're watching calories, but trust me—it adds that perfect sharpness that makes this dish pop. For the potatoes, Russets are non-negotiable—they're starchy enough to hold together when mashed. If you can't find them, Yukon Golds work in a pinch. The flour is just for thickening the gravy, so don't stress about quality here—any all-purpose will do. For the butter, Land O'Lakes or Plugrah are my go-tos; they melt smoothly without any weird aftertaste.
This pie reheats beautifully—just cover it with foil and pop it in the oven at 375°F for 15-20 minutes. Keeps for 4-5 days in the fridge, and freezes for 3 months if you wrap it tightly. I always make a double batch because the leftovers are even better the next day. Store the filling and topping separately in the fridge if you're prepping ahead, then assemble when you're ready to bake. The topping can be made a day ahead and reheated in the microwave for 30 seconds before adding to the filling.
Why You'll Love This Recipe
- One-Pot Magic: I swear by this recipe when I’m too tired to wash extra dishes—just brown the beef with onions and garlic, dump in the veggies, top with mashed Bisquick, and bake. The crust even gets golden without fuss.
- Carrot-Pea Crunch: That mix of tender carrots and bright peas adds texture I didn’t expect, but it’s the garlic that steals the show. Honestly, the aroma alone makes my kitchen smell like a cozy dinner.
- Leftovers That Don’t Suck: Between us, shepherd’s pie actually tastes better the next day—especially when reheated with a splash of milk to fluff the crust. My college kid brings it back for seconds.
- Budget Dinner Win: Ground beef, frozen peas, and a few cheap veggies stretch into a filling meal for four (or two hungry teens). I’ll be real: this is my go-to when grocery money’s tight, but no one complains.
Step-by-step instructions for Bisquick shepherd's pie
Here's how to create this hearty, creamy masterpiece in one pan—no fuss, just flavor.
Sauté the Ground Beef and Vegetables
Heat a large oven-safe skillet over medium-high heat. Add the 1.5 lb ground beef and cook, breaking it apart with a wooden spoon, until it loses its raw color—about 5-6 minutes. You're looking for browned, crumbly meat with no pink remaining.
Push the beef to one side of the pan and add 2 tablespoons of the unsalted butter. Toss in the diced yellow onion and sliced carrots, cooking for 4-5 minutes until they begin to soften. Stir in the minced garlic cloves and cook for 30 seconds until fragrant. Here's the thing—don't let the garlic burn, or it'll turn bitter and overpower the dish.
Build the Savory Filling
Sprinkle the 1 tablespoon all-purpose flour over the beef mixture and stir to coat evenly. Pour in the 1.5 cups beef broth and scrape up any browned bits from the bottom of the pan—this adds deep, meaty flavor. Bring to a gentle simmer and cook for 5 minutes until the sauce thickens slightly.
Add the thawed frozen peas, 1 teaspoon salt, 0.5 teaspoon black pepper, and 0.5 teaspoon dried thyme. Stir well and let the mixture cook for another 3-4 minutes until everything is heated through. The peas should be warmed but still bright green—overcooking will turn them mushy. Taste and adjust seasoning if needed; you want the filling to be rich and savory, not bland.
Prepare the Creamy Mashed Potato Topping
While the filling simmers, peel the 4 medium russet potatoes and place them in a pot of cold, salted water. Bring to a boil and cook for 15-20 minutes until fork-tender. Drain well and return them to the pot.
Add the 0.5 cup milk, 0.5 cup unsalted butter, and 0.5 cup shredded sharp cheddar cheese. Mash until smooth and creamy—no lumps allowed. If the mixture is too thick, add a splash more milk; if it's too thin, mash a bit more vigorously. The texture should be light and airy, almost like a thick pudding. This is your secret to that perfect, creamy topping.
Assemble and Bake to Golden Perfection
Spread the beef and vegetable mixture evenly in the skillet, creating a flat base. Spoon the mashed potato topping over the filling, using the back of a spoon to create gentle peaks and swirls. This not only looks beautiful but also helps the topping brown evenly.
Transfer the skillet to a 425°F preheated oven and bake for 20-25 minutes until the topping is golden brown and bubbly. The edges should be crispy, while the center remains soft and creamy. If the topping browns too quickly, tent loosely with foil to prevent burning. Real talk: the first time I made this, I walked away for too long and ended up with a burnt crust—don't make my mistake!
Rest and Serve with Confidence
Remove the shepherd's pie from the oven and let it rest for 5-10 minutes before serving. This resting period allows the filling to absorb any excess moisture from the topping, ensuring every bite is creamy and flavorful. The dish will be piping hot, with a crispy, golden crust that contrasts beautifully with the tender filling beneath.
Serve immediately with a side of steamed green beans or a simple garden salad. The combination of rich, savory beef and creamy mashed potatoes makes this dish incredibly comforting—perfect for a quick weeknight dinner or a cozy family meal. And the best part? It all comes together in one pan with minimal cleanup. You'll love how easy it is to pull off this classic comfort food.
Pro Tips For Making Bisquick Shepherd'S Pie
- CRUSH YOUR ONIONS: I used to slice mine too thick, and they’d turn to mush under the beef. Instead, finely dice them—smaller than a pea—so they melt into the sauce instead of sitting as chunks. (Yes, it takes 2 minutes longer, but you’ll taste the difference.)
- SALT THE BEEF TWICE: Dump the raw ground beef in a bowl, sprinkle with 1 teaspoon of salt, and mix it in before cooking. Then, season again halfway through browning. I learned this the hard way—dry, bland beef is no one’s idea of a good topping.
- DRAIN THE PEAS: Thaw those frozen peas first, then drain them thoroughly in a colander. Leftover ice water in the mix makes the mashed potatoes soggy, and no one wants a watery shepherd’s pie crust. (Pro move: Spread them on a towel to dry faster.)
- BAKE UNTIL GOLDEN: Skip the "just until bubbly" rule—bake the Bisquick crust until it’s deep golden brown, not pale. I used to pull mine out too soon, and it’d end up tasting more like a sad pancake than a crispy top. 375°F for 18–20 minutes, no excuses.
Dietary considerations for this dish
Gluten-Free Adaptation
Replace the Bisquick with 1 cup gluten-free all-purpose flour blend (like Bob's Red Mill 1:1) mixed with 1 teaspoon xanthan gum—this mimics the binding properties. For the mashed potatoes, use gluten-free butter and gluten-free milk (like Fairlife or almond milk).
The texture stays creamy, but the topping may brown slightly slower—keep an eye on it at 425°F and tent with foil if needed. 💡
Dairy-Free Version
Swap the cheddar cheese for 1 cup dairy-free shreds (like Violife or Daiya) and use unsweetened almond milk instead of whole milk. For richness, add 2 tablespoons nutritional yeast to the topping—it adds a cheesy depth without dairy.
The filling stays the same, but the topping will be slightly lighter. Test seasoning carefully; dairy-free cheeses can vary in saltiness. 🧀
Lower-Carb Option
Cut 2 cups of the mashed potatoes and replace with 2 cups cauliflower mash (steam cauliflower florets, blend with 2 tablespoons dairy-free butter and 2 tablespoons cream cheese).
This keeps the dish hearty while slashing carbs. The topping will be less dense but still crispy—bake for 15-20 minutes at 425°F to avoid over-browning. 🥬
Vegetarian Swap
Replace the ground beef with 1.5 lb lentils or crumbled tempeh (marinated in 1 tablespoon soy sauce and 1 teaspoon smoked paprika for depth). Use vegetable broth instead of beef broth, and add 1 teaspoon Worcestershire sauce for umami.
The filling will be earthier but just as satisfying—perfect for meat-free meals. 🌱
Allergen-Friendly Tips
For nut allergies, ensure all ingredients (like Bisquick or cheese) are nut-free. Check labels on frozen peas and broth for hidden allergens. If avoiding sulfites, use fresh peas instead of frozen.
For egg allergies, the recipe is naturally safe—Bisquick doesn’t contain eggs, and the topping relies on potatoes and dairy (or substitutes). Always double-check packaging! 🚫
Protein Boost
Add ½ cup cooked quinoa or ½ cup black beans to the filling for extra protein. For a high-protein topping, mix ½ cup Greek yogurt (or dairy-free yogurt) into the mashed potatoes.
This keeps the dish filling and nutrient-dense without altering the texture significantly. Ideal for post-workout meals or protein-focused diets. 💪
Nutrition facts
Frequently asked questions
Can I use ground turkey or chicken instead of beef?
Ground turkey or chicken works perfectly—just reduce cooking time slightly since poultry cooks faster than beef. For extra flavor, add 1 teaspoon smoked paprika or ½ teaspoon garlic powder to the filling. The texture will be slightly lighter but still delicious.
Why did my Bisquick topping get soggy?
Soggy topping usually means the filling was too wet or the oven temperature wasn't high enough. Always bake at 425°F and let the pie rest for 5-10 minutes before serving. For extra crispiness, broil for 1-2 minutes at the end (watch closely!).
Can I make this ahead of time?
Yes! Assemble the pie (unbaked) and refrigerate for up to 24 hours before baking. For leftovers, reheat covered at 350°F for 15-20 minutes. The flavors actually improve overnight. Freeze baked portions for 3 months—just reheat covered at 350°F until warmed through.
What if I don't have Bisquick?
Mix 2 cups all-purpose flour, 1 tablespoon baking powder, and ½ teaspoon salt as a substitute. For creaminess, add ¼ cup milk to the dry mix. The texture will be slightly denser but still tasty.
How do I make it extra crispy?
Pat the mashed potato topping dry with a paper towel before spreading it on the filling. Bake at 425°F for 20 minutes, then broil for 1-2 minutes until golden. For even more crunch, sprinkle ¼ cup crushed potato chips on top before baking.