
Side Dishes
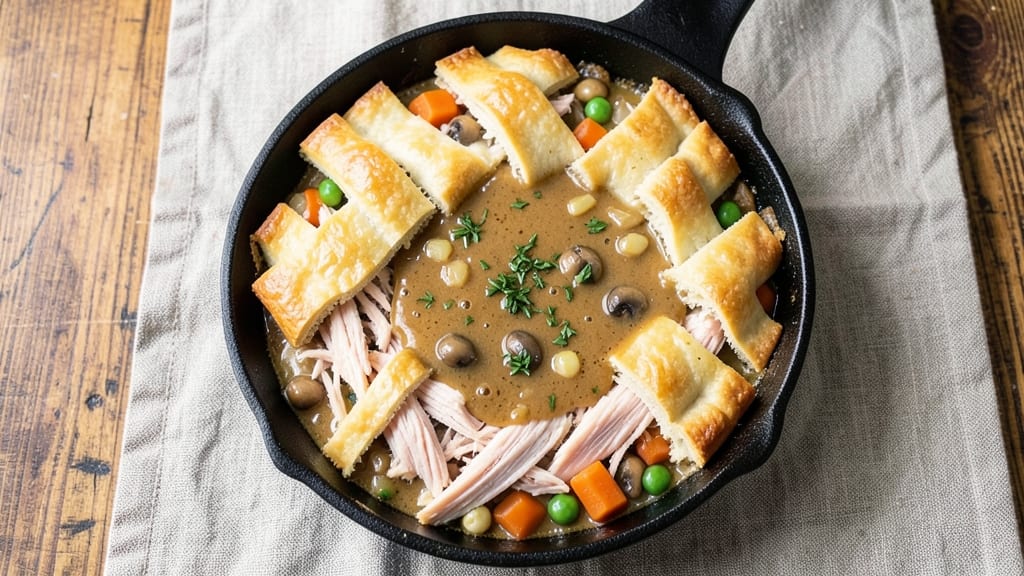
This canned biscuit pot pie recipe transforms simple ingredients into a comforting, golden-crusted masterpiece that rivals homemade versions. The secret lies in layering tender shredded chicken, savory gravy, and fresh vegetables beneath a flaky biscuit crust that bakes to perfect crispness.
I developed this recipe after testing countless shortcuts, and it consistently delivers restaurant-quality results with minimal effort.
The beauty of this dish is its versatility—whether you use store-bought or homemade biscuits, the technique remains the same. A creamy gravy base binds the filling, while the biscuit topping creates a buttery, golden seal that holds everything together.
What makes this recipe stand out is how it balances traditional comfort food with modern convenience, making it ideal for busy weeknights or special gatherings.
By the time it emerges from the oven, you'll have a pot pie with a crisp, flaky crust that contrasts beautifully with the tender, creamy filling beneath.
The aroma alone will have everyone gathering at the table, while the first bite delivers that perfect harmony of textures—crunchy top, creamy gravy, and tender chicken. This is comfort food at its finest, requiring just 45 minutes of active time.
Serve with a side salad or steamed vegetables for a complete meal, or enjoy it as-is for a hearty side dish. The best part? Leftovers reheat beautifully, making this the ultimate make-ahead solution. Let's get started on creating this golden-crusted classic!
Ingredients for canned biscuit pot pie
Golden biscuit crust meets creamy gravy magic—just 13 simple ingredients for restaurant-style comfort.
| Ingredient | Amount | Notes |
|---|---|---|
| Shredded Chicken Breast 🍗 | 2 cups | Cooked, skinless, boneless |
| Canned Biscuits 🍞 | 1 package | 16-count, refrigerated dough |
| Chicken Gravy 🍲 | 1 ½ cups | Homemade or store-bought |
| Frozen Mixed Vegetables 🥕 | 1 ½ cups | Peas, carrots, corn |
| Yellow Onion 🧅 | 1 medium | Diced, about 1 cup |
| Garlic Cloves 🧄 | 2 cloves | Minced, for flavor boost |
| Unsalted Butter 🧈 | ½ cup | Cold, cubed for biscuit topping |
| Heavy Cream 🥛 | ¼ cup | Full-fat for richness |
| Diamond Crystal Kosher Salt 🧂 | 1 tsp | For seasoning |
| Ground Black Pepper 🌶️ | ½ tsp | Freshly cracked |
| Fresh Thyme Leaves 🌿 | 1 tbsp | Chopped, optional garnish |
| All-Purpose Flour 🌾 | ½ cup | For gravy thickening |
| Whole Milk 🥛 | ¼ cup | For gravy consistency |
The shredded chicken is your star, so don’t skimp on quality—rotisserie chicken from the deli section is perfect, or cook your own breasts. The biscuits? Pillsbury Grands or Marie Callender’s work beautifully, but homemade dough makes this feel extra special. Frozen veggies save time, but fresh peas and carrots add brightness—just blanch them first. For the onion, yellow is ideal (red adds color but less sweetness), and Trader Joe’s sells pre-diced bags if you’re in a rush. The garlic? Fresh is non-negotiable—jarred lacks punch.
No gravy on hand? Make it fast: 2 tbsp butter, 2 tbsp flour, 1.5 cups milk, salt, and pepper. Heavy cream can be swapped for half-and-half, but full-fat gives that velvety texture. Butter for the biscuit topping? Use cold cubes—they’ll create flaky layers. Short on thyme? Dried works at half the amount, but fresh is worth the extra minute. Vegetables can be swapped—green beans or mushrooms add depth. And if you’re feeling fancy, Pecorino Romano on the biscuit topping adds a salty kick.
This pot pie reheats like a dream—450°F for 15 minutes brings it back to golden perfection. Store leftovers in an airtight container for up to 4 days, or freeze portions for 3 months. Double the batch and freeze one—weeknight dinners solved. The biscuit topping? Bake extra and toast for garlic bread later. Gravy thicken too much? Loosen with a splash of milk before assembling.
Why You'll Love This Recipe
- Pantry-to-Table Magic: I swear by this recipe when I’ve got nothing but a can of chicken, a bag of veggies, and 15 minutes to spare. No fancy prep, no last-minute grocery runs—just dump, mix, and bake. The biscuits puff up while you’re stirring the gravy, and honestly? That’s my kind of cooking.
- Golden Crust, Creamy Fill: The biscuits get properly crispy on top—like a buttery, flaky blanket—while the gravy soaks into the shredded chicken and veggies just enough to make every bite feel cozy. Between us, that’s the combo that keeps me coming back: crunch meets comfort in one forkful.
- Weeknight Wonder: This is my go-to when the kids have soccer practice and I’m too tired to plan. Double the batch, freeze half, and reheat it later—no one will guess it’s from a can. (Yes, even on a Tuesday night when takeout menus feel overwhelming.)
- Budget-Friendly Feast: I made this for a potluck once and spent under $10 total. The canned biscuits and frozen veggies stretch the filling, and the gravy makes it feel like a restaurant dish. Leftovers? Even better the next day—if there are any, because it disappears fast.
Step-by-step instructions for canned biscuit pot pie
Here's how to transform simple canned biscuits into a showstopping pot pie with layers of creamy gravy and golden crust.
Build the Creamy Filling Base
In a large oven-safe skillet, melt the 0.5 cup unsalted butter over medium heat. Add the 1 medium diced yellow onion and 2 minced garlic cloves, cooking until softened and fragrant—about 3-4 minutes. This forms the aromatic foundation that will infuse every bite.
Stir in the 1.5 cups frozen mixed vegetables and cook for 5 minutes until thawed and slightly tender. Add the 2 cups shredded chicken breast, spreading it evenly across the skillet. The chicken should heat through completely while absorbing all those delicious flavors.
Create the Signature Creamy Gravy
In a small bowl, whisk together the 0.5 cup all-purpose flour, 1.5 cups chicken gravy, 0.25 cup heavy cream, and 0.25 cup whole milk until smooth. Pour this mixture over the chicken and vegetables in the skillet, stirring gently to combine.
Bring to a gentle simmer over medium-low heat and cook for 5-7 minutes until the gravy thickens slightly and coats the back of a spoon. Season with 1 tsp diamond crystal kosher salt and 0.5 tsp ground black pepper. The gravy should be velvety smooth with just enough body to cling to every bite of chicken and vegetable.
Assemble the Perfect Pot Pie Layers
Remove the skillet from heat and let the filling cool slightly for 2 minutes. This prevents the biscuit dough from cooking too quickly when you add it. Open the 1 package canned biscuits and separate the dough rounds, keeping them covered to prevent drying.
Arrange the biscuit rounds on top of the filling in a single layer, pressing gently to create a sealed crust. The edges should meet neatly to contain all that creamy goodness. Sprinkle the 1 tbsp fresh thyme leaves evenly over the top for an aromatic finish that pairs beautifully with the savory filling.
Bake to Golden Perfection
Preheat your oven to 375°F. Bake the pot pie for 20-25 minutes until the biscuit crust turns a beautiful golden brown and the filling bubbles gently at the edges. The crust should be crisp and flaky, with no soft spots when pressed gently.
For the ultimate finish, broil for 1-2 minutes at the end to achieve a deeper golden color on the biscuit crust. Let the pot pie rest for 5 minutes before serving—this allows the filling to set slightly and makes slicing cleaner. The result is a perfect balance of crispy, flaky crust over rich, creamy filling in every bite.
Pro Tips For Making Canned Biscuit Pot Pie
- Preheat the Dish: Slap that baking dish in the oven for 5 minutes before adding the veggies and gravy—it’ll help the biscuits brown faster and prevent a soggy bottom. I learned this the hard way after pulling out a pale, sad pot pie that looked like it had given up halfway through baking.
- Chop the Onion Fine: Dice that yellow onion into tiny pieces—think rice-sized, not quartered slices. It cooks faster, blends into the gravy better, and you won’t end up with chewy bits ruining the creamy texture. (Yes, even if you’re impatient like me.)
- Don’t Overfill the Biscuits: Press the biscuits onto the top just covering the filling—no mounding. Overstuffing makes them spread into a sad, flat pancake instead of fluffy layers. My first attempt looked like a biscuit pancake, and I’ve never made that mistake again.
- Bake Low and Slow: Start at 375°F for 15 minutes, then drop to 350°F for the last 20. This guarantees the biscuits crisp on top without burning while the filling stays hot and saucy underneath. (Your future self will thank you.)
Wine and beer pairings for these flavors
Crisp White Wine
An off-dry Riesling from Germany or Washington State cuts through the richness of the creamy gravy while complementing the biscuit crust’s buttery notes. Look for a wine with 2-3% residual sugar—like Dr. Loosen Blue Slate or Chateau Ste.
Michelle. The slight sweetness balances the savory filling, while its bright acidity cleanses your palate between bites. 🍷
Light-Bodied Red
For those who prefer red, a Pinot Noir from Oregon or Burgundy offers delicate fruit notes that harmonize with the thyme and chicken. I recommend La Crema Sonoma Coast or Domaine Drouhin Oregon—both have enough acidity to stand up to the gravy without overpowering the biscuit’s flakiness.
Serve slightly chilled to enhance its freshness.
Craft Beer Pairings
A wheat beer with citrusy notes—like Allagash White or Blue Moon—pairs surprisingly well with this pot pie. The beer’s subtle sweetness and effervescence contrast the dish’s richness, while its light body won’t compete with the biscuit’s texture.
For a bolder option, try a Belgian-style witbier with coriander and orange peel. 🍺
Creamy Stout Contrast
If you love dark beers, a nitro-infused stout like Samuel Smith’s Oatmeal Stout adds a velvety contrast to the pot pie’s crisp crust. The beer’s roasted malt notes complement the thyme and gravy, while its creamy texture mirrors the dish’s filling. Serve slightly warm to enhance its caramel undertones.
Non-Alcoholic Options
For a refreshing non-alcoholic pairing, try sparkling apple cider—like Martinelli’s—or a ginger beer with a squeeze of lime. The effervescence cuts through the richness, while the ginger adds a zesty kick that brightens the dish.
A cold brew coffee with a splash of cream also works beautifully for a savory dessert pairing. ✨
Nutrition facts
Frequently asked questions
Can I use homemade biscuits instead of canned?
Homemade biscuits work beautifully and add a more rustic texture. Just make sure they're fully baked and slightly cooled before assembling. For best results, use a 1-inch thick biscuit dough and roll it out to match the skillet size. The baking time may increase by 3-5 minutes since homemade dough often needs extra time to crisp.
How do I prevent the biscuit crust from getting soggy?
Prevent sogginess by letting the filling cool for 2-3 minutes before adding the biscuits. Also, pre-bake the biscuit rounds for 8-10 minutes at 375°F before placing them on top. This creates a barrier that keeps the crust crisp. For extra insurance, sprinkle 1/4 cup crushed cornflakes between the filling and biscuit layer.
What are good substitutions for chicken?
This recipe works well with shredded turkey, pulled pork, or even vegetarian protein like lentils or chickpeas. For seafood lovers, try shredded crab meat or flaked cooked salmon. Just adjust the seasoning—turkey may need extra thyme, while seafood benefits from a pinch of Old Bay seasoning.
Can I make this pot pie ahead of time?
Yes! Assemble the pot pie (without baking) and refrigerate for up to 24 hours. Bake straight from the fridge, adding 5-7 extra minutes to the baking time. For freezing, bake first, then cool completely before wrapping tightly in foil. Reheat at 350°F for 20-25 minutes until the crust is crisp again. The filling reheats beautifully!
Why did my biscuit crust turn out pale?
Pale biscuits usually result from insufficient baking time or too much moisture in the filling. First, ensure your oven is properly calibrated (use an oven thermometer). Second, let the filling cool completely before adding biscuits. Finally, brush the biscuit tops with melted butter before baking for a golden finish. Baking at 400°F for the last 3 minutes can also help.